Data Wolf was developed to address the need that scientific research is increasingly being done in virtual communities. These virtual communities are often larger in size and are not co-located. One example of these virtual communities can be seen in the hydrology community where groups of scientists have come together to look at Digital Watersheds. The idea of a Digital Watershed is to give the community access to an integrated view of digital data, research results and derived data. All this data can be stored in repositories accessible by scientists allowing them to overlay the data on top of maps to give them a better understanding of the Digital Watershed. Scientists can add their new data, results and models to these repositories. The general process of adding new models/approaches/ideas (knowledge) to the results of previous research and obtaining new scientific results would be understood as knowledge sharing and integration. The overall effort leading to virtual spaces is also denoted as cyberinfrastructure development. The US-coined term cyberinfrastructure (CI) usually refers to the integration of infrastructure technologies and has been used interchangeably with the European-coined term eScience.
Data Wolf was designed to be an integral part of a cyberinfrastructure software system with the goal of reducing the time to and from discovery. In a typical research lifecycle, theoretical hypotheses are formulated, experiments are conducted, and publications are delivered. As part of the research lifecycle, one has to follow the publication trail, re-implement software and repeat experiments, customize experiments according to more general hypotheses, and deliver new publications about new discoveries. Reusing results, tools, and insights from one research project to the next is an integral part of scientific research. Currently, this process can be very time and resource consuming, as well as sometimes intractable. Our objective is to reduce the amount of time and resources needed to conduct new science and introduce tractability of research results. This objective is achieved by integrating computationally driven experiments (Data Wolf) with custom delivery of experimental results (publishing results to the web) via published workflows that can be ran as small web applications or as part of a larger web application. Data Wolf simplifies the integration of data and modeling tools to support research and enable cross disciplinary integration to produce targeted outputs that address particular engineering and educational needs. Thus, the impact of such a technological integration and development of new features lies in the fact that multiple results from research lifecycles become immediately available for interactive explorations (web publishing), linked to the experimental settings and codes (scientific workflows) and retrievable for further studies from content repositories (information sharing).
## Scientific Workflow
To get started, it is important to first understand the term scientific workflow. A scientific workflow system is a specialized form of a workflow management system designed specifically to compose and execute a series of computational or data manipulation steps, or a workflow, in a scientific application. A workflow consists of a sequence of connected steps where each step follows without delay or gap and ends just before the subsequent step can begin. It is a depiction of a sequence of operations, declared as work, of one or more simple or complex mechanisms.
## Definitions
A workflow step consists of several parts:

* **Input** - data used by an algorithm
* **Output** - data that is created by an algorithm
* **Parameter** - controls the algorithm being executed (e.g. number of monte carlo simulations)
* **Tool** - the encapsulation of the algorithm
* **Step** - a single execution of a tool
By stringing together one or more steps you can create a workflow as illustrated by the simple two step workflow below:

* **Workflow** - sequence of steps
* **Executor** - code to execute a type of tool (e.g. a Java executor knows how to execute Java tools)
* **Engine** - code to execute a workflow
A workflow does not have to be a sequential set of steps since the workflow engine will manage whether a step is ready to execute (e.g. all inputs are satisfied). In the above example, step 2 will not execute until the data has been produced by step 1. The types of executors that Data Wolf supports will be discussed in the architecture section.
## Architecture
Data Wolf is designed to facilitate the documentation and dissemination of scientific work with a system that makes it easy to create and share workflows while separating the science from the logistics of execution. This allows scientists to focus on research without concerning themselves with the details of where the workflow will execute, how will the data be stored, how do I share my results, etc. Models, algorithms, and data are kept in open formats so they are accessible outside the scientific workflow system and models that are encapsulated by a workflow can be exposed as a RESTful web service. Data Wolf has 3 main components: 1) Editor (DataWolf JS), 2) Service layer (RESTful service) and 3) Engine as shown in the diagram below:
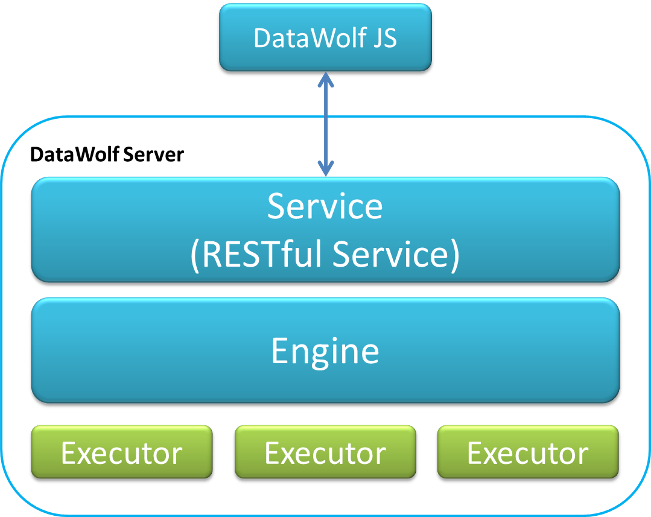
Each part will be elaborated on in the next few sections, starting at the bottom and working our way up to the Editor (Data Wolf JS).
### Technologies
Data Wolf is a Java application that uses the Guice dependency injection framework to bind data access objects for persisting application information. A generic Create/Read/Update/Delete (CRUD) service layer is implemented by a set of data access objects (DAO) that follow the Java Persistance API (JPA). The Object Relational Mapping (ORM) uses Hibernate and the injected data access objects handle the CRUD operations. In addition to the available JPA data access objects, some DAOs have been written for the Clowder Content Management system. This allows finer control over where certain objects are persisted. For example, workflows, tools, steps, etc can be persisted using JPA and data can be persisted to a content management system. For simplicity, the default DataWolf download uses the JPA DAOs to store application data in a HSQL database; however, this can be any relational database. For example, in production, we have used MySQL extensively in large projects with very good performance.
### Engine
The Data Wolf Engine is the core of Data Wolf. The engine manages executing tools with the appropriate executor so Java tools are executed using the Java Executor, Command Line tools use the Command Line Executor, and High Performance Computing (HPC) tools use the HPC Executor. The engine passes the tool to the executor and then it will manage setting up the tool for execution, executing the tool, storing logging information, and saving output data. The engine has a queueing system so jobs can execute when an executor is ready and if there are jobs that do not finish before Data Wolf is shutdown, it will restart those jobs. More information about the types of executors will be discussed in the next section.
### Executors
There are two types of executors in Data Wolf, Local Executors and Remote Executors, which represent where a tool is executing. Local executors are designed to run on the same machine as Data Wolf with Data Wolf controlling the executors that are running. Only a limited number of parallel processes are allowed with local executors and configuring this will be discussed in the section on Data Wolf Server.
In contrast, Remote executors are designed to run on different machines than the client and process management is done outside of Data Wolf. Since the remote machine is handling job management, Data Wolf will attempt to run all executors expecting that the remote machine will handle the queueing. Data Wolf will poll the remote machine periodically to check on job status so results can be retrieved for finished jobs and any subsequent steps that might be waiting on the remote step can get ready to execute.
The next few sections will discuss concrete examples of executors that are available and cover a wide variety of tools so they can be used in Data Wolf workflows.
#### Java Executor
The Java Executor is a local executor capable of executing Java code. Models that are written in Java should implement the **JavaTool** interface referenced below:
```
public interface JavaTool {
public String getName();
public int getVersion();
public String getDescription();
public Collection<Dataset> getInputs();
public void setInput(String id, InputStream input);
public Collection<Dataset> getOutputs();
public InputStream getOutput(String id);
public Collection<Parameter> getParameters();
public void setParameter(String id, String value);
public void setTempFolder(File tempfolder);
public void execute() throws AbortException, FailedException;
}
```
* **getName** - returns a short name of the tool
* **getVersion** - returns the version number of the tool
* **getDescription** - returns a longer description of the tool
* **getInputs** - returns a collection of input descriptions for the algorithm
* **setInput** - provides an input to the algorithm
* **getOutputs** - returns a collection of output descriptions of the algorithm
* **getOutput** - provides the outputs produced by the algorithm
* **getParameters** - returns a collection of parameter descriptions of the algorithm
* **setParameter** - provides a parameter to the algorithm
* **setTempFolder** - tells the algorithm where it can store temp files
* **execute** - is where the algorithm is implemented
If you are interested, you can find the source code for a simple Java tool that implements Grep here: https://opensource.ncsa.illinois.edu/stash/users/cnavarro/repos/grep-demo. In the Web Editor section, we'll discuss creating a Java tool in Data Wolf using a compiled version of this Grep tool.
#### Command Line Executor
The Command Line executor is a local executor capable of executing command line tools that are available on the local machine. A few examples are `netstat`, `grep`, `ls`, etc. The command line executor executes command line tools in a temporary folder and depending on how the tool is configured, it can capture both standard out and standard error. Inputs that are specified when the tool is created will be copied to the temporary folder before executing and outputs that are generated will be copied to the location specified when Data Wolf is setup (e.g. metadata might be in MySQL and data might be on disk). This will be discussed in the section that discusses setting up Data Wolf.
If you already have an executable (e.g. your model is written in C/C++/etc) and you just want to run it in Data Wolf, the Command Line Executor makes it very easy to add your tool to Data Wolf without any modification to your code. The Web Editor provides a step by step process that guides you through specifying information about your tool (e.g. input flags, input data, output data, etc) to assist in importing it into Data Wolf. Once your tool is imported, it can be used by itself in a workflow or as a step in a larger workflow. In the Web Editor section, we'll discuss creating a command line tool for executing `netstat` as part of a two step workflow and demonstrate the step by step process for importing a command line tool.
#### HPC Executor
The HPC Executor is a Remote Executor that uses SSH Channels to communicate with various queueing systems for submitting jobs to high performance computers (HPC) such as the [XSEDE](http://www.xsede.org) resources. The remote executor is similar to the command line executor except the execution line (executable, flags, inputs, etc) for the tool are appended to a script and submitted to a queueing system. When creating an HPC tool, an XML definition file with information about the HPC (e.g. location of submit, terminate, and status commands), a script to append the execution line to, and the regular expressions necessary for parsing job status messages, must be provided. The executor will use this information to communicate with the HPC to submit jobs, cancel jobs, get job status, etc. The queueing systems that have been tested with the HPCExecutor include Portable Batch System (PBS), IBM Loadleveler, and Sun Grid Engine (SGE), which was minimally tested.
### REST Interface
Data Wolf provides a thin service layer that wraps around the Data Wolf Engine and exposes all primary functionality through a REST API that clients can program against. Below are all of Data Wolf's REST endpoints and a brief description about them. For a more information on how to use each endpoint, please see the javadoc associated with the service layer. If you are interested in an example that uses the the REST API, checkout the source code for the web editor. Instructions are included in the Source Code section.
**People**
request method | URL | Description
-------------- | --- | -----------
GET | persons | get a list of people
GET | persons/{person-id} | get a user by id
POST | persons | create a new user
DELETE | persons/{person-id} | id of user to delete
**Login**
request method | URL | Description
-------------- | --- | -----------
GET | login | Login a user by email and password
POST | login | Create a user eaccount with specified email and password
PUT | login/{person-id}/active | Enable/Disable user accounts
DELETE | login | Delete specified user account
**Workflows**
request method | URL | Description
-------------- | --- | -----------
GET | workflows | get all workflows
GET | workflows/{workflow-id} | get workflow by id
GET | workflows/{workflow-id}/zip | get a zip of the workflow by id
GET | workflows/{workflow-id}/executions | get all executions associated with workflow id
GET | workflows/{workflow-id}/steps | get all steps of workflow
GET | workflows/{workflow-id}/steps/{step-id} | get a specific step of a workflow
POST | workflows | create a new workflow
PUT | workflows/{workflow-id} | update a workflow
DELETE | workflows/{workflow-id} | delete a workflow by id
**Datasets**
request method | URL | Description
-------------- | --- | -----------
GET | datasets | get all datasets
GET | datasets/{dataset-id} | get dataset by id
GET | datasets/{dataset-id}/zip | get a zip file containing dataset by id
GET | datasets/{dataset-id}/{filedescriptor-id} | get a file descriptor by dataset id and file descriptor id
GET | datasets/{dataset-id}/{filedescriptor-id}/file | get the file by dataset id and file descriptor id
POST | datasets | create a dataset from the included zip file
PUT | datasets/{dataset-id}/purge | delete dataset by id from storage
DELETE | datasets/{dataset-id} | mark dataset as deleted
DELETE | datasets/{dataset-id}/{filedescriptor-id}/delete | delete the filedescriptor by dataset id and file descriptor id
**LogFiles**
request method | URL | Description
-------------- | --- | -----------
GET | logfiles | get all logfiles
GET | logfiles/{logfile-id} | get a logfile by id
**WorkflowTools**
request method | URL | Description
-------------- | --- | -----------
GET | workflowtools | get all workflow tools
GET | workflowtools/{tool-id} | get workflow tool for by id
POST | workflowtools | create a workflow tool
DELETE | workflowtools/{tool-id} | delete workflow tool by id
**Executions**
request method | URL | Description
-------------- | --- | -----------
GET | executions | get all executions
GET | executions/{execution-id} | get execution by id
GET | executions/{execution-id}/logfiles | get all logfiles associated with an execution
GET | executions/{execution-id}/logfiles/{step-id} | get logfile associated with a single step of the execution
GET | executions/{execution-id}/state | get the state of all steps in an execution
POST | executions | create an execution for a submission
DELETE | executions/{execution-id} | delete execution by id
PUT | executions/{execution-id}/start | start an execution
PUT | executions/{execution-id}/cancel | cancel an execution
**Executors**
request method | URL | Description
-------------- | --- | -----------
GET | executors | get all available executors
## Web Editor
The Data Wolf Web Editor is an exploratory workflow system written in HTML5/JavaScript that emphasizes distributed execution of arbitrary software, data reproducibility, and ease of use. Data Wolf addresses the problem of analytical reproducibility in an era where nearly all research/practice involves software and digital data, and where both software and digital data can change over time thus preventing the reproduction of results. The projects using Data Wolf have developed interactive Web applications with easy-to-use interfaces supported by sophisticated back-end analyses and models for specific science, industry, and policy domains. The Web Editor allows users to create these sophisticated analyses through a graphical user interface (GUI) that interacts with Data Wolf to add new tools, create workflows, import data, execute workflows, etc using their web browser.
We'll begin with a brief discussion of the architecture and technologies used in the Web Editor and then we'll go through the steps to install and begin using the web editor to add some example tools, build and execute an example workflow and obtain results. This should provide a good understanding of how you can get your tools into Data Wolf.
### Technologies
The web editor is an HTML5/Javascript application that allows a user to interact with Data Wolf to build and execute workflows. For reference, a brief description of the Javascript libraries used in the Web Editor can be seen below:
* Twitter Bootstrap
* a Mobile first front end that eases the task of developing the client user interface for multiple screen sizes. Twitter-Bootstrap will scale widgets to best fit the device that you are using. It includes a lot of general components and examples that can be customized further based on the needs of the application.
* Backbone JS
* a framework that gives structure to web applications by providing models with key-value binding and custom events, collections with a rich API of enumerable functions, views with declarative event handling, and connects it all to to an existing API over a RESTful JSON interface.
* Underscore JS
* a utility-belt library for JavaScript that provides a lot of functional programming support that you would expect in Prototype JS or Ruby, but without extending any of the built-in JavaScript objects.
* jQuery
* a fast, small, and feature-rich JavaScript library that makes things like HTML document traversal and manipulation, event handling, animation, and Ajax much simpler with an easy-to-use API that works across a multitude of web browsers.
* jQuery-UI
* a curated set of user interface interactions, effects, widgets, and themes built on top of the jQuery JavaScript library.
* jsPlumb
* a JavaScript library that provides a means for a developer to visually connect elements on their web pages. It uses SVG or Canvas in modern browsers, and VML on IE 8 and below.
* dualStorage
* an adapter for Backbone's Backbone.Sync() method to handle saving to a localStorage database as a cache for the remote models. This allows us to provide offline capabilities so users can continue to work while disconnected from the internet and then when reconnected, the model changes will be synchronized with the server.
### Download
The latest version of Data Wolf can be downloaded from:
https://opensource.ncsa.illinois.edu/projects/artifacts.php?key=WOLF
By default, the latest release is selected in the page (currently 4.1.0). To get early access to development releases, check the box **Show also prereleases.**
* Click on **Version**
* Select **4.1.0**
* Under **Files** select **datawolf-webapp-all-4.1.0-bin.zip**
* Click **I Accept** to accept the License.
This will give you the latest stable build that includes both the Data Wolf Server and the Web Editor. You can also find links to the javacode there as well as the manual. The link to the source code can be found at the end of this document.
### Installation and Setup
To install the files necessary for the Server and Editor, find where you downloaded Data Wolf and unzip it somewhere. This will create a folder called **datawolf-webapp-all-4.1.0**. In the next few sections, we'll discuss some of the important files that come with the installation you just unzipped so you can tailor your setup to meet your needs. If you wish to skip this, you can go directly to the section **Running Data Wolf Server and Editor**.
#### Data Wolf properties
Open the folder that was created by unzipping the installation zip file and go into the **Conf** folder. You should see a file called **datawolf.properties**. For the purpose of running Data Wolf server and editor, you won't need to make any changes to this file or understand its contents. However, for those who are interested, the rest of this section will dissect the file for informational purposes to highlight the important parts of the file you might want to modify to configure available executors and where information is stored. If you open the **datawolf.properties** in a text editor, you should see the snippet below:
```
#Clowder settings
#clowder.server=http://localhost:9000/
#clowder.key=
#Local Disk settings
disk.levels=3
disk.folder=data/files
```
* **Clowder settings**
* **clowder.server** Uncomment this to specify the Clowder server URL.
* * **clowder.key** Uncomment this to specify the key for the Clowder server.
* **Local Disk settings** By default, Data Wolf is configured to store data on local disk.
* **disk.levels** - indicates the number of folder levels to use, this prevents too many files in a single folder
* **disk.folder** - indicates the location on disk to store the files.
The next snippet will discuss the available properties for configuring the Engine, Executors and initial set of administrators in the properties file.
```
#Engine settings
engine.extraLocalExecutor = 1
engine.localExecutorThreads = 8
engine.storeLogs = false
engine.timeout = 3600
# Executors
java.executor=edu.illinois.ncsa.datawolf.executor.java.JavaExecutor
commandline.executor=edu.illinois.ncsa.datawolf.executor.commandline.CommandLineExecutor
hpc.executor=edu.illinois.ncsa.datawolf.executor.hpc.HPCExecutor
# Initial admins for the DataWolf server, this is a comma separated list of
# email addresses who will automatically get active accounts with admin access
# when they sign up.
initialAdmins=""
```
* **Engine settings**
* **extraLocalExecutor** - number of jobs that can be in local executor queue
* **localExecutorThreads** - sets the number of worker threads for the local executor
* **storeLogs** - store logs execution logs in the database. By default, step execution logs are not stored.
* **timeout** - time, in seconds, before a workflow execution times out
* **Executors**
* **java.executor** - Comment this out to exclude the Java executor.
* **commandline.executor** - Comment this out to exclude the Commandline executor.
* **hpc.executor** - Comment this out to exclude the HPC executor.
* **Initial admins**
* **initialAdmins** - a comma separated list of email addresses for administrators. When accounts with matching email addresses sign up, they will automatically be active and have admin level access.
The next section specifies the bean that will define where object information is stored. By default, object information is stored in a Hyper SQL Database because it requires no additional setup by the user to get started with Data Wolf. There are two additional **dataSource** options defined in the application context that demonstrate other storage options; however, the storage could be any relational database. The snippet below shows how to specify an in memory hsql database.
The next snippet covers where object information is stored. By default, this information is stored in a Hyper SQL Database (HSQL DB) because it requires no additional setup by the user to get started with Data Wolf. There are two additional options defined in the **datawolf.properties** that demonstrate other storage options; however, the storage could be any relational database. Below you will see the settings for a file based hsql database (default):
```
#HSQL File
hibernate.hikari.dataSourceClassName=org.hsqldb.jdbc.JDBCDataSource
hibernate.dialect=org.hibernate.dialect.HSQLDialect
hibernate.hikari.dataSource.url=jdbc:hsqldb:file:data/db;shutdown=true;hsqldb.write_delay=false
hibernate.hikari.dataSource.user=sa
hibernate.hikari.dataSource.password=
```
The snippet below highlights the sample settings for using an in memory HSQL database:
```
#HSQL Memory DB
#hibernate.hikari.dataSourceClassName=org.hsqldb.jdbc.JDBCDataSource
#hibernate.dialect=org.hibernate.dialect.HSQLDialect
#hibernate.hikari.dataSource.url=jdbc:hsqldb:mem:.
#hibernate.hikari.dataSource.user=sa
#hibernate.hikari.dataSource.password=
```
The snippet below highlights the sample settings for using a MySQL database instead of the default. This would require additional setup and configuration of the machine and is beyond the scope of this manual.
```
#HikariCP MySQL settings
#hibernate.hikari.maximumPoolSize=100
#hibernate.hikari.idleTimeout=30000
#hibernate.hikari.dataSourceClassName=com.mysql.jdbc.jdbc2.optional.MysqlDataSource
#hibernate.hikari.dataSource.url=jdbc:mysql://localhost/datawolf
#hibernate.hikari.dataSource.user=datawolf
#hibernate.hikari.dataSource.password=datawolf
```
Below you will see the section that defines the DAOs to bind for the CRUD service layer, in this case the JPA DAOs. You should not need to modify this section unless you will be using Clowder to store datasets.
```
# JPA DAO Configuration
person.dao = edu.illinois.ncsa.jpa.dao.PersonJPADao
submission.dao = edu.illinois.ncsa.datawolf.jpa.dao.SubmissionJPADao
workflow.dao = edu.illinois.ncsa.datawolf.jpa.dao.WorkflowJPADao
workflowstep.dao = edu.illinois.ncsa.datawolf.jpa.dao.WorkflowStepJPADao
workflowtool.dao = edu.illinois.ncsa.datawolf.jpa.dao.WorkflowToolJPADao
workflowtoolparameter.dao = edu.illinois.ncsa.datawolf.jpa.dao.WorkflowToolParameterJPADao
workflowtooldata.dao = edu.illinois.ncsa.datawolf.jpa.dao.WorkflowToolDataJPADao
execution.dao = edu.illinois.ncsa.datawolf.jpa.dao.ExecutionJPADao
logfile.dao = edu.illinois.ncsa.datawolf.jpa.dao.LogFileJPADao
hpcjobinfo.dao = edu.illinois.ncsa.datawolf.jpa.dao.HPCJobInfoJPADao
account.dao = edu.illinois.ncsa.jpa.dao.AccountJPADao
dataset.dao = edu.illinois.ncsa.jpa.dao.DatasetJPADao
filedescriptor.dao = edu.illinois.ncsa.jpa.dao.FileDescriptorJPADao
```
The snippet below defines two additional DAOs that are used for storing datasets in Clowder. If Clowder is configured to store datasets, then you must comment out the equivalent JPA DAOs so there is no binding conflict (e.g. comment out the dataset.dao and filedescriptor.dao). In addition, this will also require a Clowder server to be configured and the correct properties in the Clowder section above to be specified (e.g. clowder.server, clowder.key).
```
# Clowder DAO Configuration
#filedescriptor.dao = edu.illinois.ncsa.clowder.dao.FileDescriptorClowderDao
#dataset.dao = edu.illinois.ncsa.clowder.dao.DatasetClowderDao
#person.dao = edu.illinois.ncsa.clowder.dao.PersonClowderDao
```
The last part of the file defines the storage configuration options currently available in Data Wolf. These options represent two implementations of Data Wolf's **FileStorage** interface; developers that are interested in providing new storage options should look at that interface in the **ncsa-common-domain** project.
```
# Storage configuration
#filestorage = edu.illinois.ncsa.clowder.impl.FileStorageClowder
filestorage = edu.illinois.ncsa.domain.impl.FileStorageDisk
```
* **Storage configuration**
* **filestorage** - specify whether data should be stored in Clowder or local disk. Default is local disk. If using the Clowder Dataset dao, you will need to configure data to be stored in Clowder.
The next section will discuss the launch script for Data Wolf.
#### Launch Scripts
If you go back to the folder **Data Wolf-webapp-all-3.1.0-SNAPSHOT** you will see a sub-folder called **bin**, open this. Inside you will find two scripts, **datawolf-service** and **datawolf-service.bat**. The latter is intended for running Data Wolf on a Windows machine and the former is for running on Mac & Linux. As with the previous section, knowledge of this file is not required unless you are interested in configuring the Data Wolf Server and Editor beyond the default settings. We will show snippets of the file **datawolf-service** and discuss what each section is configuring.
```
# port for the jetty server
PORT=8888
```
As stated in the comment, this is the port that Jetty will launch the service. You can change this to any other open port, but for most users, 8888 should be free.
```
# context root for datawolf server, needed when behind nginx
CONTEXT=/datawolf
```
This will set the path where datawolf can be reached at, the default is at /datawolf, you can change this here and it will be applied to the editor as well. This is especially important if you have a webserver with a proxy running in front of this service.
```
# log file, leave blank for console
#LOG="--out ${PWD}/log/Data Wolf-yyyy_mm_dd.log"
```
If you remove the **#** in front of **LOG**, then this will have the server generate a log file in a folder called **log** in the folder you unzipped. This can be useful for debugging problems such as ports in use (in the case where port 8888 is unavailable) and other issues running workflows.
```
# Use authentication to access APIs
USE_AUTH=false
```
By default, API authentication is disabled. Setting the USE_AUTH flag to true will enable API authentication.
```
# setup for the server
WAR=$( ls -1 lib/Data Wolf-webapp-all*.war | tail -1 )
SERVER=""
if [ "${WAR}" != "" ]; then
SERVER=${PWD}/conf/server.xml
WAR="${PWD}/${WAR}"
cat > "${SERVER}" << EOF
<Configure class="org.eclipse.jetty.webapp.WebAppContext">
<Set name="contextPath">${CONTEXT}/</Set>
<Set name="war">${WAR}</Set>
</Configure>
EOF
fi
```
The above snippet specifies where to find the war file for the Data Wolf Server and generates the file **server.xml** inside the **conf** folder so Jetty knows where to find the application context and war file.
* **contextPath** - specifies the link for the server, in this case it will be the root of the URL http://localhost:8888/datawolf.
* **war** - specifies where Jetty can find the war file.
You can modify these settings to change the server path used by the server.
```
# setup for the editor
WAR=$( ls -1 lib/Data Wolf-editor*.war | tail -1 )
EDITOR=""
if [ "${WAR}" != "" ]; then
EDITOR=${PWD}/conf/editor.xml
WAR="${PWD}/${WAR}"
cat > "${EDITOR}" << EOF
<Configure class="org.eclipse.jetty.webapp.WebAppContext">
<Set name="contextPath">${CONTEXT}/editor</Set>
<Set name="war">${WAR}</Set>
</Configure>
EOF
fi
```
Similar to the server, this generates an **editor.xml** file inside the **conf** folder and contains the configuration information for the Editor.
* **contextPath** - specifies the link for the web editor, in this case it will be http://localhost:8888/datawolf/editor.
* **war** - specifies where Jetty can find the war file.
#### CORS Configuration
If you plan on making DataWolf requests from a Web service (e.g. a web application), then you will need to enable cross origin resource sharing (CORS). To do this, locate the war file named **datawolf-webapp-all-{version}-SNAPSHOT.war** inside the **lib** folder where you installed DataWolf. Open the war file and locate the **web.xml** file inside the **WEB-INF** folder. If you open the web.xml file in a text editor, you should see the commented out lines below:
```
<!-- Cross origin resource sharing filter -->
<!--
<filter>
<filter-name>CORS</filter-name>
<filter-class>com.thetransactioncompany.cors.CORSFilter</filter-class>
<init-param>
<param-name>cors.allowOrigin</param-name>
<param-value>*</param-value>
</init-param>
<init-param>
<param-name>cors.supportedMethods</param-name>
<param-value>GET, POST, HEAD, PUT, OPTIONS, DELETE</param-value>
</init-param>
<init-param>
<param-name>cors.supportedHeaders</param-name>
<param-value>*</param-value>
</init-param>
<init-param>
<param-name>cors.supportsCredentials</param-name>
<param-value>true</param-value>
</init-param>
</filter>
-->
<!--
<filter-mapping>
<filter-name>CORS</filter-name>
<url-pattern>/*</url-pattern>
</filter-mapping>
-->
```
To enable CORS, uncomment the above sections in the web.xml file and restart DataWolf. While these parameters will enable CORS in DataWolf, there are additional parameters that can be tweaked depending on your setup.
#### Running Data Wolf Server and Editor
To start Data Wolf Server and Editor, do the following:
On Linux/Mac:
```dos
> datawolf-service
```
on Windows:
```dos
> datawolf-service.bat
```
### Launch the Web Editor
After launching the datawolf-service script, you will have both a Data Wolf Server and Web Editor running. To open the web editor, go to http://localhost:8888/datawolf/editor. You should see a login page similar to the one below:

If you don't have an account on Data Wolf, fill in the registration form and click **Register with email** link to create an account. Unless you are an administrator, you will need to contact the server administrator to enable your new account.
After you register an account and it is activated, the next time you see the login page just enter the email address you registered and click the **Sign-in** button. This should bring you to a page that looks similar to the one below:
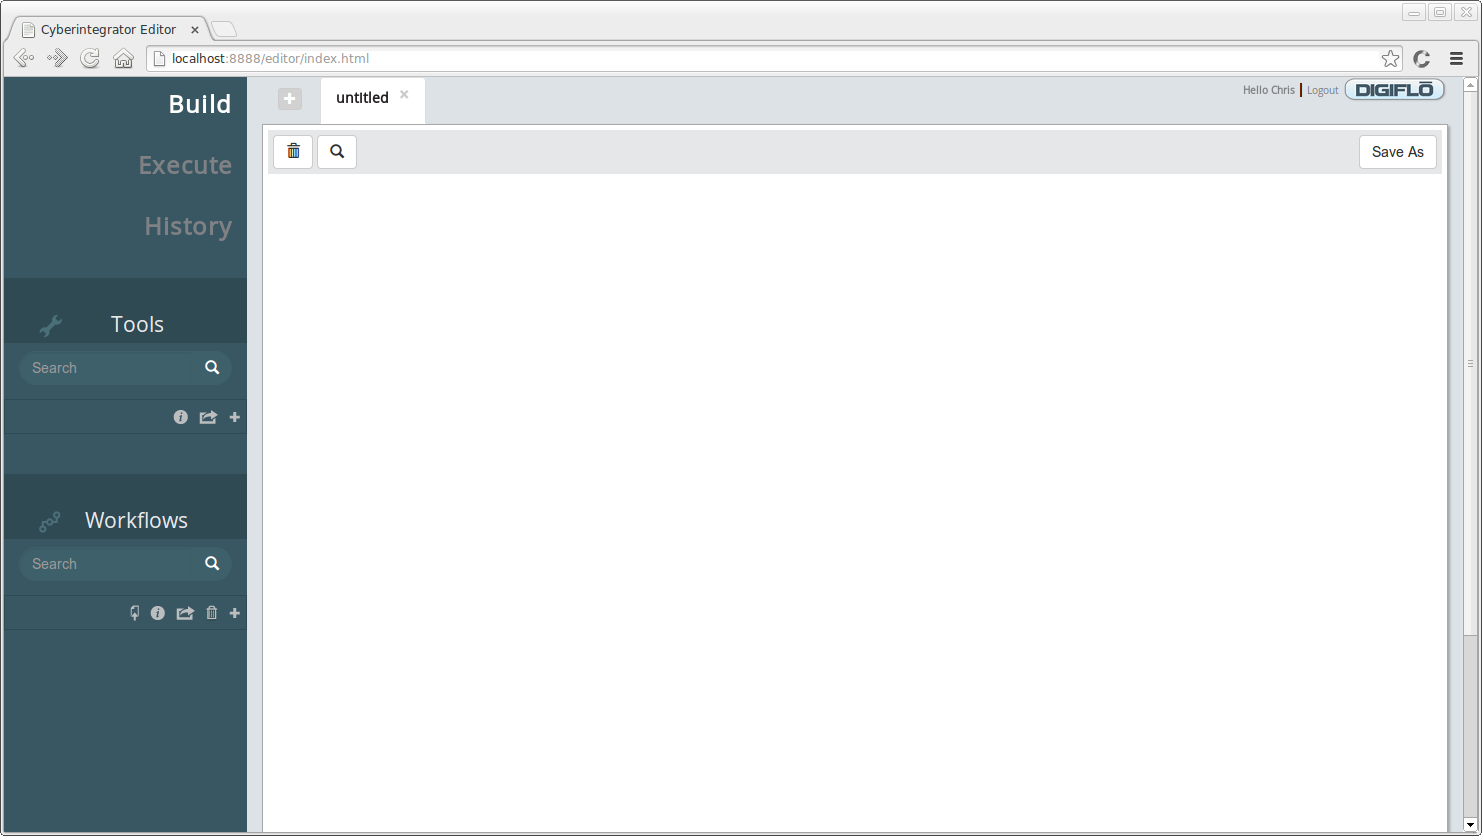
There are three main tabs associated with the Web Editor.
* **Build**
* Tools view - allows users to create tools and get more information about tools that the system has available.
* Workflows view - allows users to create new workflows, open existing workflows for editing, delete existing workflows, and get more information about existing workflows.
* Workflow Graph - one graph per workflow can be opened at any one time. Users can drag and drop tools onto the graph, connect tools, remove tools, and specify the workflow name. In the above image, the workflow graph is shown as **untitled** since it is an empty canvas. Once a tool is dropped onto the canvas, a new workflow will be created.
* **Execute**
* Workflows view - allows users to open existing workflows and prepare them for submission to the Data Wolf server. Users can specify parameters and inputs and then execute the workflow by submitting the form page.
* Datasets view - allows users to add new datasets, get information about datasets and delete datasets from Data Wolf.
* **History**
* Executions view - allows users to see past submissions, get information about each workflow step, obtain step logs, download results, etc.
### Creating Tools in Data Wolf
There are 3 types of tools currently supported by Data Wolf: Java tools, Command Line tools and HPC tools. To illustrate the first two types of tools, we will create a simple workflow that runs the **netstat** executable as a command line tool and passes the output data to a Java tool that implements the **grep** functionality. First, let's create the command line tool.
* Click the () button to open the **Select Tool Type** dialog.
* From the dropdown menu, select **Command Line**.
You should see a dialog similar to the one below:
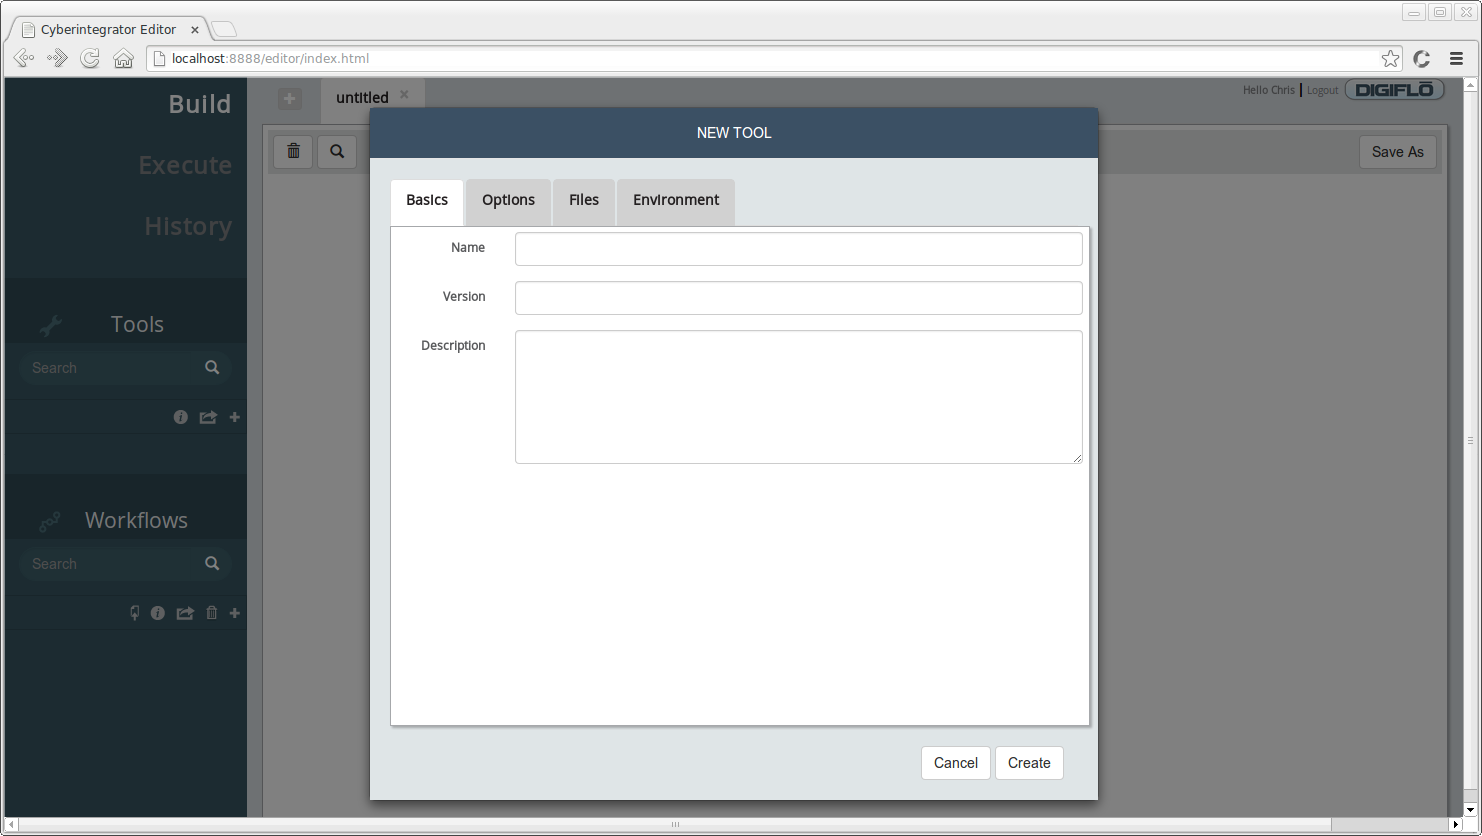
Fill in the following information for the **Basics** tab:
* **Name** - *Netstat*
* **Version** - *1.0*
* **Description** - *gathers network statistics*
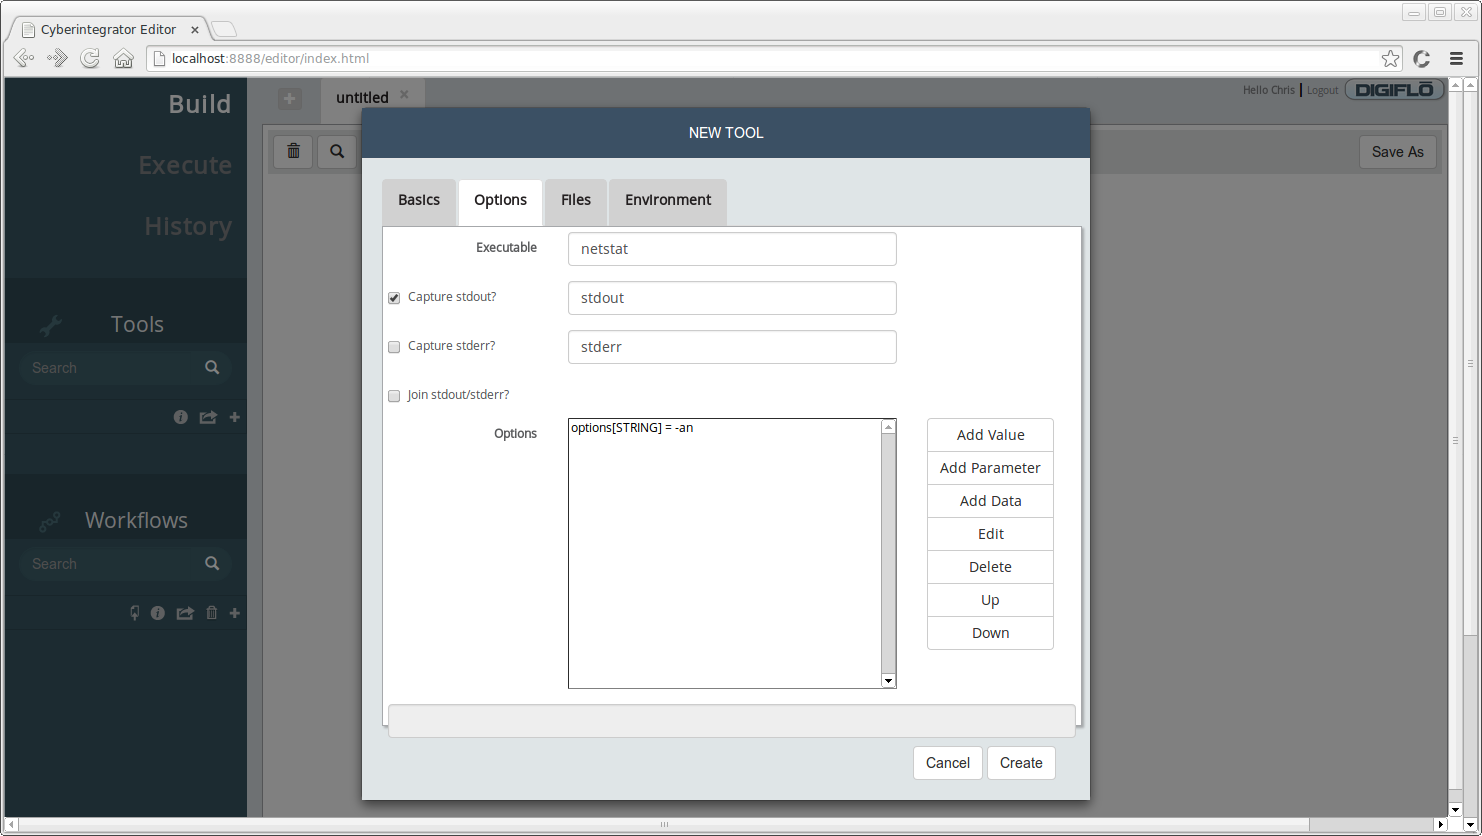
Next, click on the **Options** tab. Here we will specify the name of the executable along with other parameters that for this tool.
* **Executable** - *netstat*
* Check the box where it says **Capture stdout?**
To add a parameter for the tool, click the **Add Parameter** button. You should see a dialog similar to the one below:
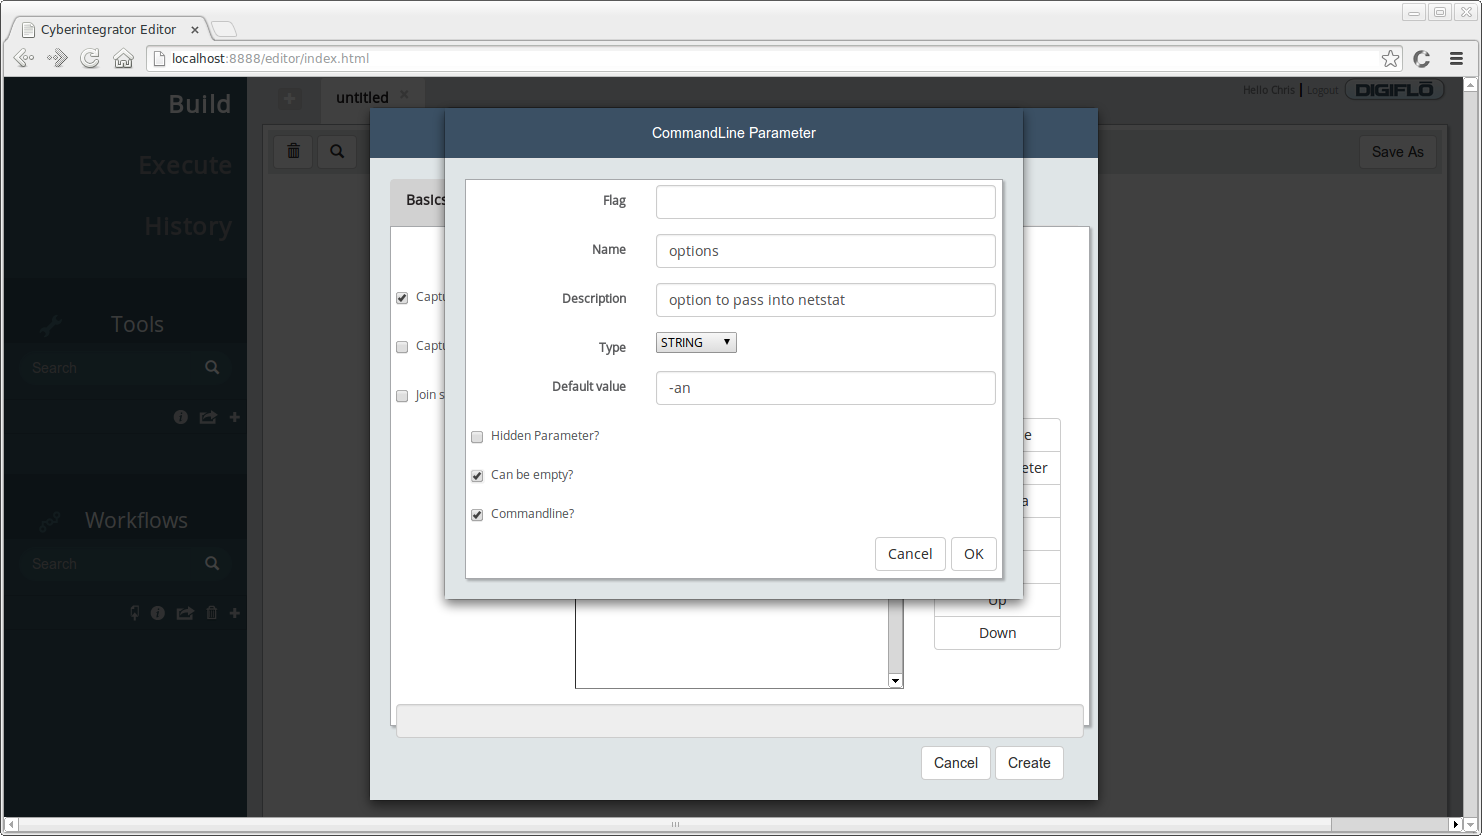
* **Name** - specifies the parameter friendly name to display, enter *options*
* **Description** - short description for the parameter, enter *option to pass into netstat*
* **Default value** - provide a default value for a parameter, if desired. For our case, specify *-an* as the default value.
* **Can be empty?** - specifies whether this parameter is optional. In the case of netstat, it can run without any parameters so check this box.
* **Commandline?** - specifies whether this parameter should be passed to the executable at the command line. For our case, check this box.
* Click **OK** after entering the above information.
Your **Options** tab should look similar to the one below:
To create the new tool, click the **Create** button. You should have a tool called **netstat** under **Tools**. The color of the tool indicates the type of executor the tool requires. We'll see in the next step how this differs for the Grep tool.
Next, we will add a Java tool that can take the output from netstat and search for a matching expression.
* Click the () button again to open the **Select Tool Type** dialog.
* From the dropdown menu, select **Java**
You should see a dialog similar to the one below:
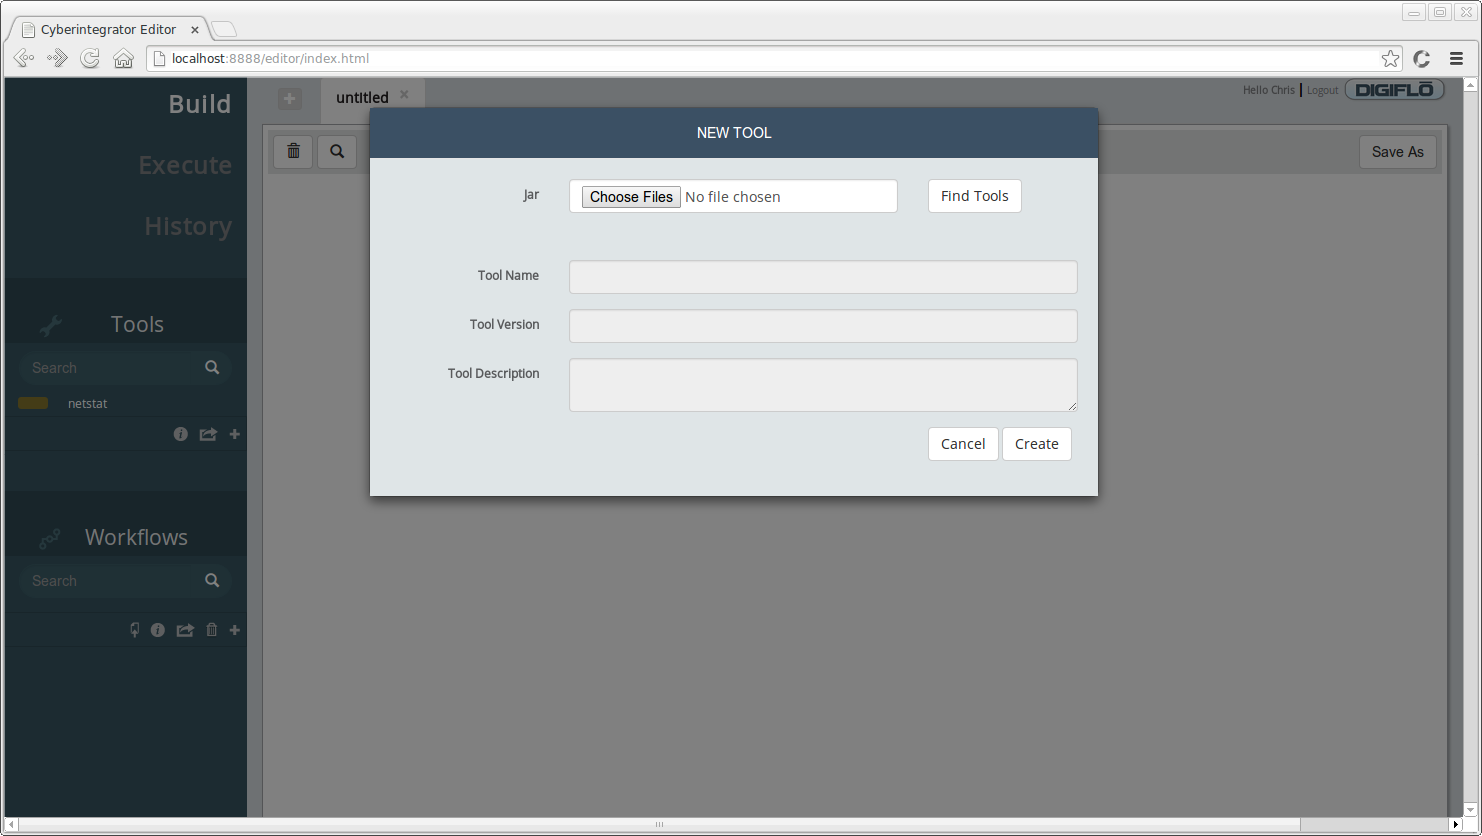
You will need to download the following Jar file for the grep tool [here](data/grep-tool-example-0.0.1-SNAPSHOT.jar). After you download the file **grep-tool-example-0.0.1-SNAPSHOT.jar**, do the following:
1. Click on the **Choose Files** button and select the file you downloaded. You can select multiple files with this dialog if your Java tool required additional Jar files.
2. Click on the **Find Tools** button to see which tools are available in the Jar or Jar files you selected.
3. Select **edu.illinois.isda.tool.demo.GrepTool**.
4. Click **Create**
You should now see a second tool under the **Tools** view called **Grep** that has a different color than the **netstat** tool. We now have one tool that requires the Java executor (blue) and another tool that requires the Command Line executor (yellow/green).
### Creating Workflows in Data Wolf
The next step is to create a new workflow so we can add tools and connect them together. There are 3 ways to create a new workflow.
1. The easiest way to start building a new workflow is to drag and drop tools onto the **untitled** view that is displayed by default when you open the Web Editor.
2. Alternatively, you can click the () button in the **Workflows** toolbar.
3. Or, you can click the () button next to the **untitled** view.
Let's use option 1 and use the mouse to drag and drop the **netstat** and **Grep** tool onto the **untitled** view. You will need to click and drag each tool individually. After doing so, you should now see a view similar to the one below:
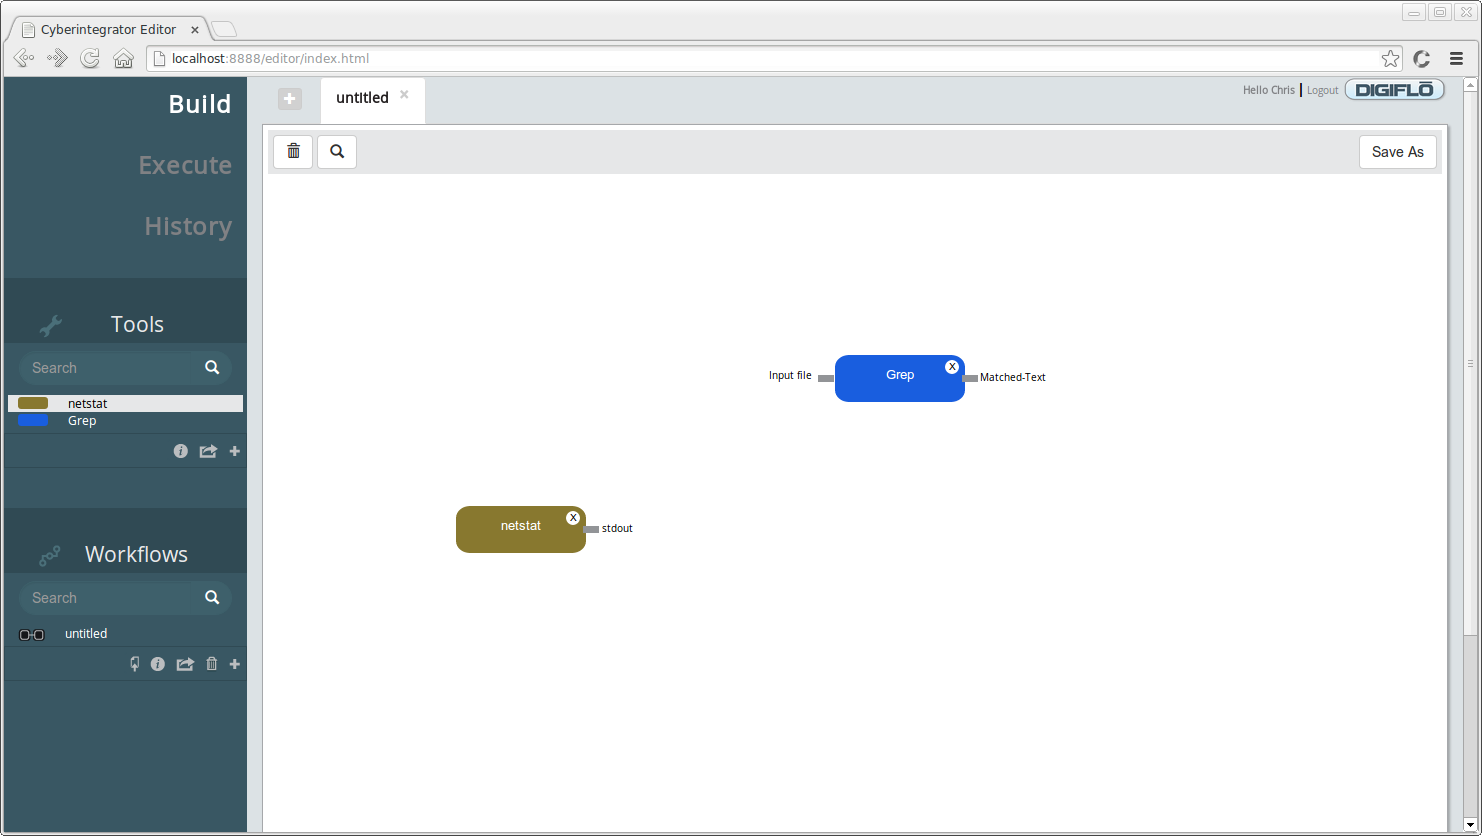
There are a few things to notice. First, under **Workflows** we now have a new **untitled** workflow. After we dropped the first tool onto the graph, a new workflow was created for us and persisted to the Data Wolf server using the **/workflows** REST endpoint. At this point, our two step workflow is saved and we could close our web browser and continue with this later. Also notice that each tool has the following:
* The tool is labelled by it's name and colored by the executor it uses.
* Inputs are indicated by labelled connection points on the left side of the tool.
* Outputs are indicated by labelled connection points on the right side of the tool.
* The tool can be removed by clicked the (X) in the upper right corner.
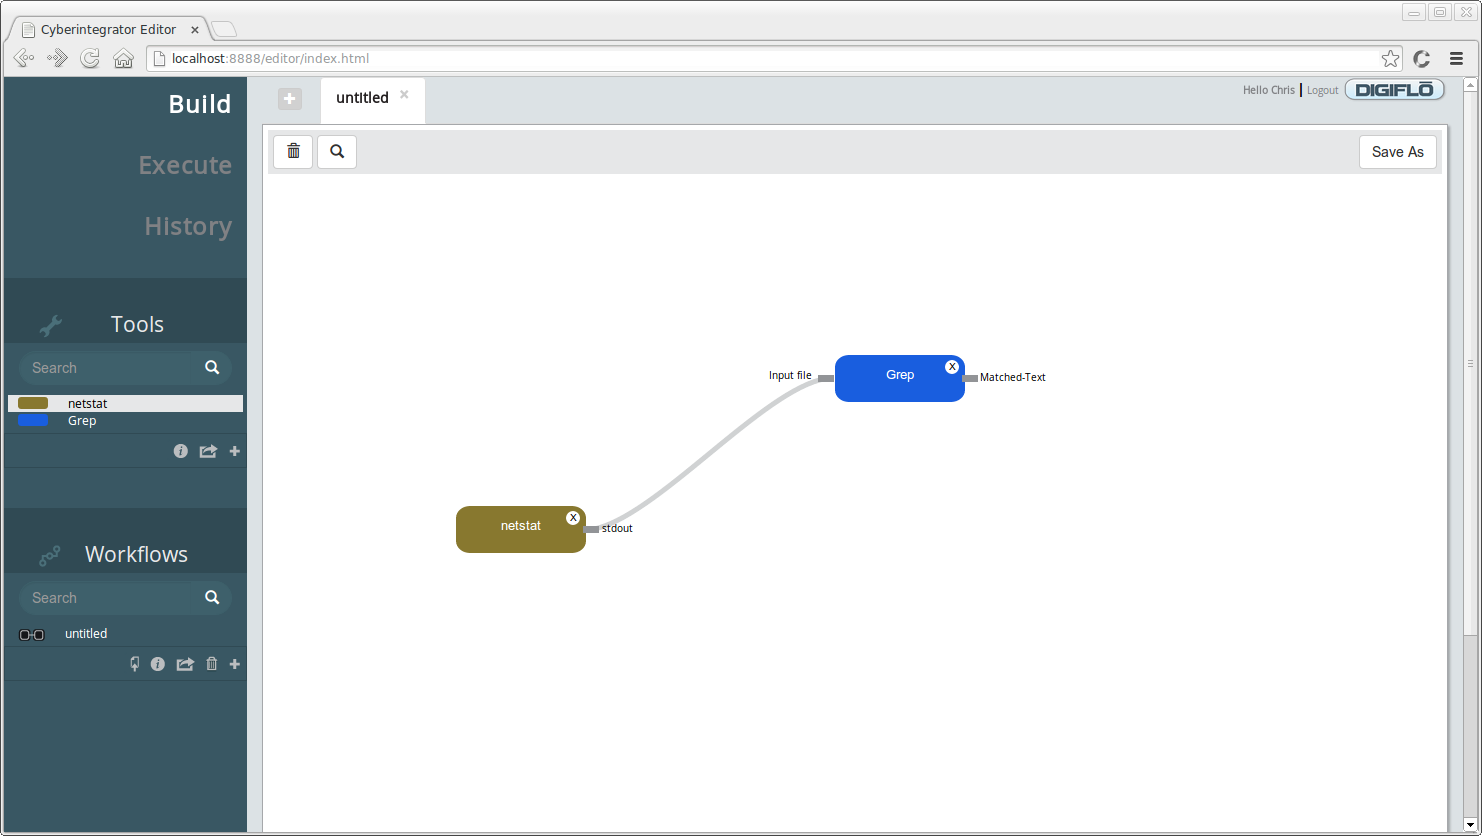
To connect our tools together, use your mouse to click and drag the **stdout** output from **netstat** to the **Input file** input connection of **Grep**. The endpoint should turn light blue to indicate your mouse is hovering over the endpoint and it's ready to be selected. After connecting the two workflow steps together, your workflow graph should look similar to the one below:
Before we move on to executing the workflow we've just created, let's look at a few additional features of the Web Editor. To give our workflow a different name, do the following:
1. Click the **Save As** button in the upper right toolbar of the Workflow graph view.
2. In the dialog that is displayed, enter the name *Netstat-Grep-Example* and click **Save**
After clicking save, the title of the tab and the title of the workflow under **Workflows** should display **Netstat-Grep-Example**.
If we want to get more information about a tool or workflow, do the following:
1. Select the **Grep** tool under **Tools**
2. Click the () button in the **Tools** view toolbar
You should see an informational popup similar to the one below:
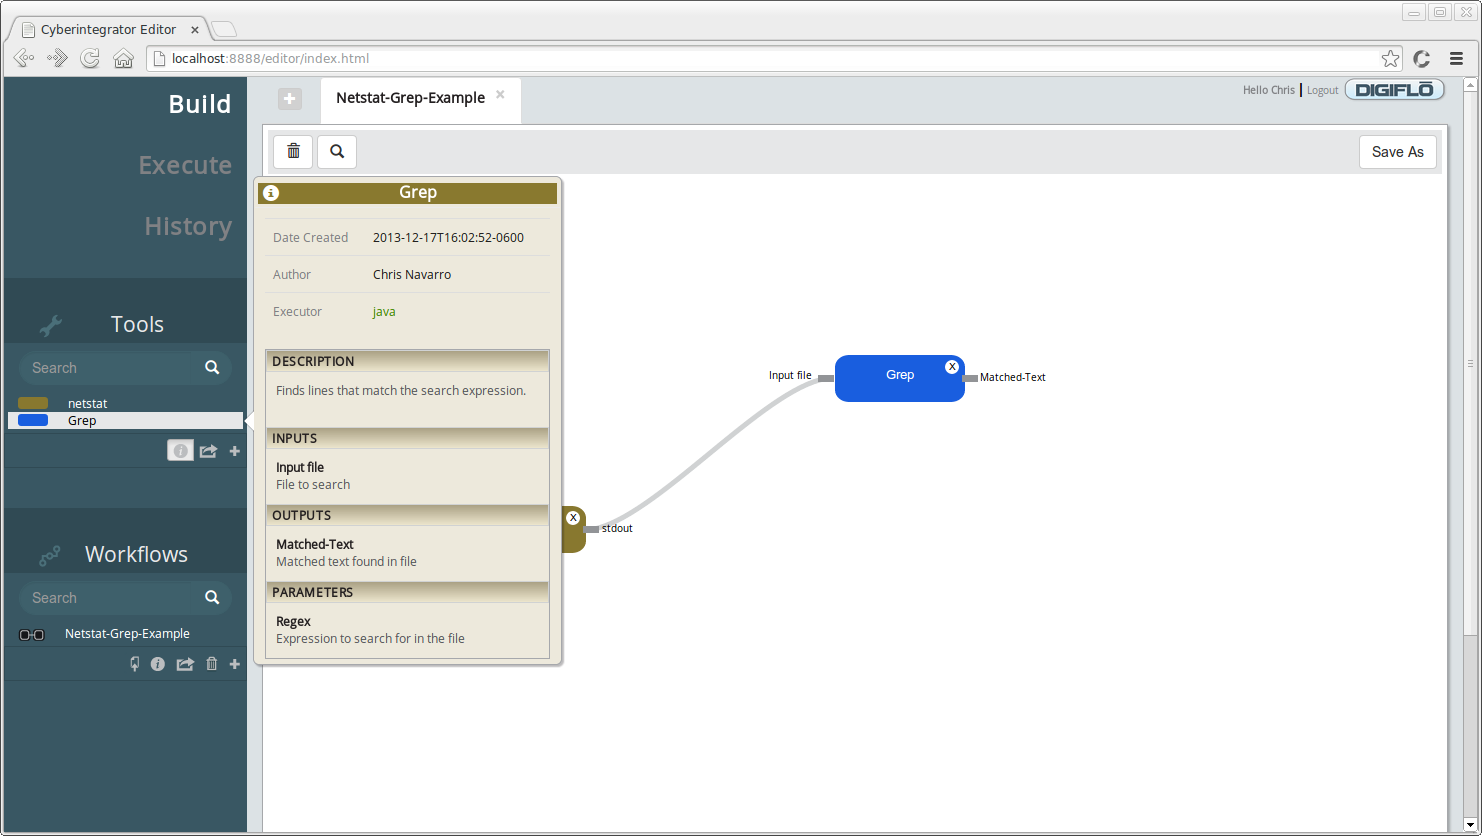
The information view lists the following information:
* Date Created - date the tool was created
* Author - the person who created the tool
* Description - a short description of what the tool does
* Inputs - tool inputs and a short description about each input
* Outputs - tool outputs and a short description about each output
* Parameters - tool parameters and a short description about each parameter
To dismiss the information view, click on the () button again.
### Executing Workflows in Data Wolf
To execute the workflow, navigate to the **Execution** page by clicking on **Execute** in the upper left navigation menu. There, you should see the workflow we created under the **Workflows** view. To open it, do the following:
* Select **Netstat-Grep-Example** and click the () button.
You should see a form open displaying the parameters and inputs for the selected workflow. Complete this form with the following information:
1. **Submission Title** - enter a title for the submission, e.g. *netstat-grep-submission*
2. **Submission Description** - enter a short description for the submission, e.g. *sample netstat grep workflow*
3. **Regex** - enter an string to match from the output of netstat, e.g. .\*LISTEN.\*
Your form page should look similar to the following:
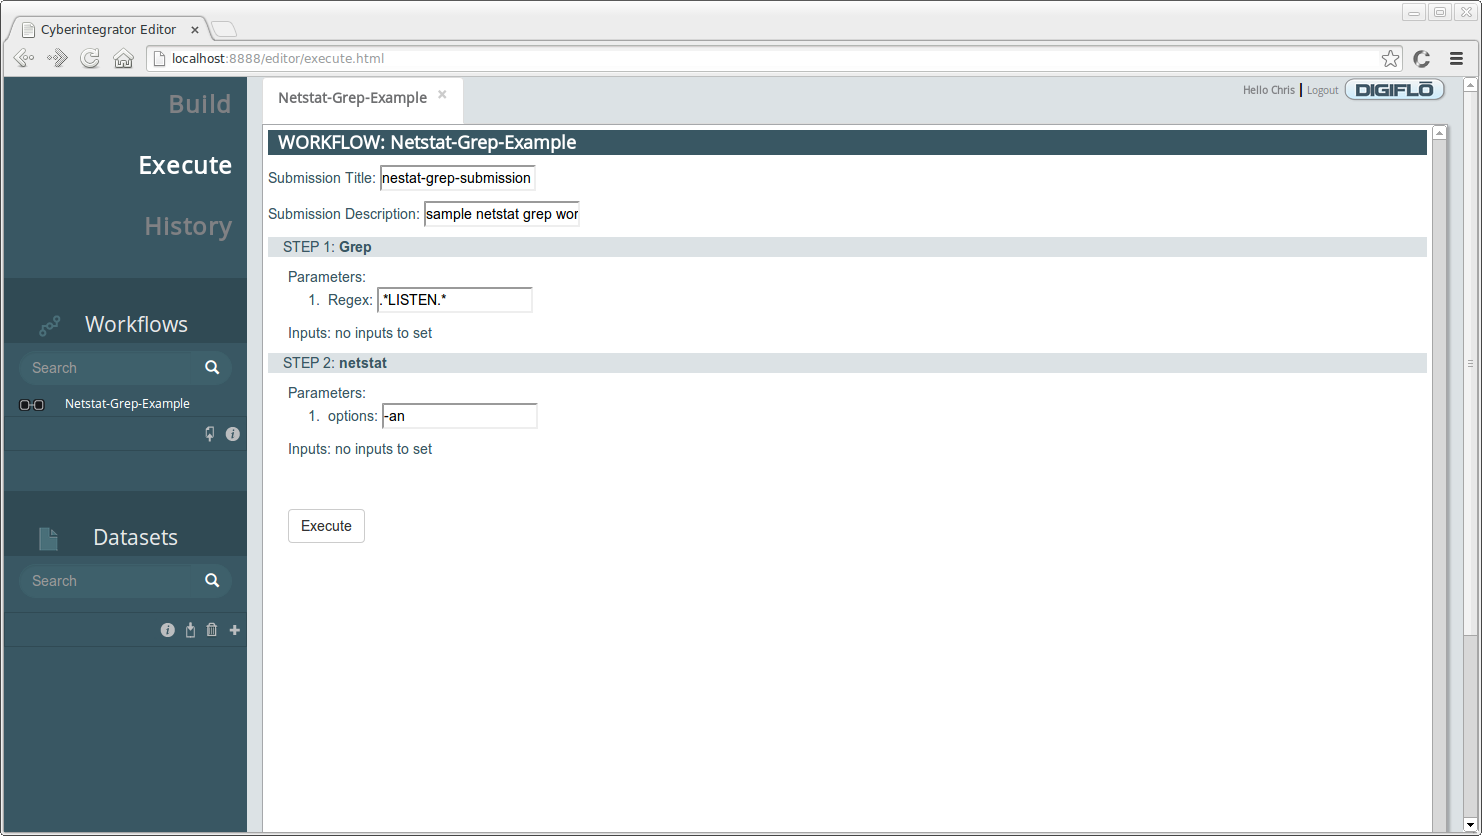
For the **netstat** tool, since we specified **-an** as the default, it is displayed in the parameter input box and there was no need to enter it. After checking that all input fields are satisfied, click **Execute** to submit the workflow for execution. You should see a small popup indicating that your workflow was submitted successfully.
### Execution History
To see the results of our sample workflow, click on the **History** tab in the navigation menu. Listed under **Executions** you should see a submission with the title you gave it in the **Execute** tab. To get information about the workflow execution, do one of the following:
* Double click on the execution to open it
* Select the execution and click the () button.
The opened execution should look similar to the one below:

The execution information that gets displayed is:
* **Execution title** - title of the submitted execution
* **Execution description** - description of the execution
* **Status** - status of the step execution
* **Runtime** - time in milliseconds that it took to execute the step
* **Generated outputs** - a link to the outputs generated by the step. Click the link to view the data.
* **Log file** - a link to the log file for the steps execution. Click the link to view the log file. This can be very useful for debugging a step that fails to execute.
To see all of the matches of the expression we entered, .\*LISTEN.\*, click on the **Matched-Text** output. The output you see will vary from machine to machine since the listening ports will be different depending on what software you have installed and running, but you should see something similar to the output below:
```
tcp 0 0 127.0.0.1:3306 0.0.0.0:* LISTEN
tcp 0 0 0.0.0.0:80 0.0.0.0:* LISTEN
tcp 0 0 0.0.0.0:4369 0.0.0.0:* LISTEN
tcp 0 0 127.0.1.1:53 0.0.0.0:* LISTEN
tcp 0 0 0.0.0.0:22 0.0.0.0:* LISTEN
tcp 0 0 127.0.0.1:631 0.0.0.0:* LISTEN
tcp 0 0 0.0.0.0:55672 0.0.0.0:* LISTEN
tcp 0 0 0.0.0.0:17500 0.0.0.0:* LISTEN
tcp 0 0 0.0.0.0:44573 0.0.0.0:* LISTEN
tcp6 0 0 127.0.0.1:8005 :::* LISTEN
tcp6 0 0 :::5672 :::* LISTEN
tcp6 0 0 :::8080 :::* LISTEN
tcp6 0 0 :::22 :::* LISTEN
tcp6 0 0 ::1:631 :::* LISTEN
tcp6 0 0 :::8888 :::* LISTEN
```
### Adding Data to Data Wolf
Adding data to Data Wolf can be done through the **Execute** tab. If you navigate back to that tab, you should see the datasets that were produced by the workflow we executed, **Matched-Text** and **stdout**. If your workflow requires input data that needs to be passed into one or more tools, the **Datasets** view is where you can add it. If you click the () button, you should see a dialog similar to the one below:
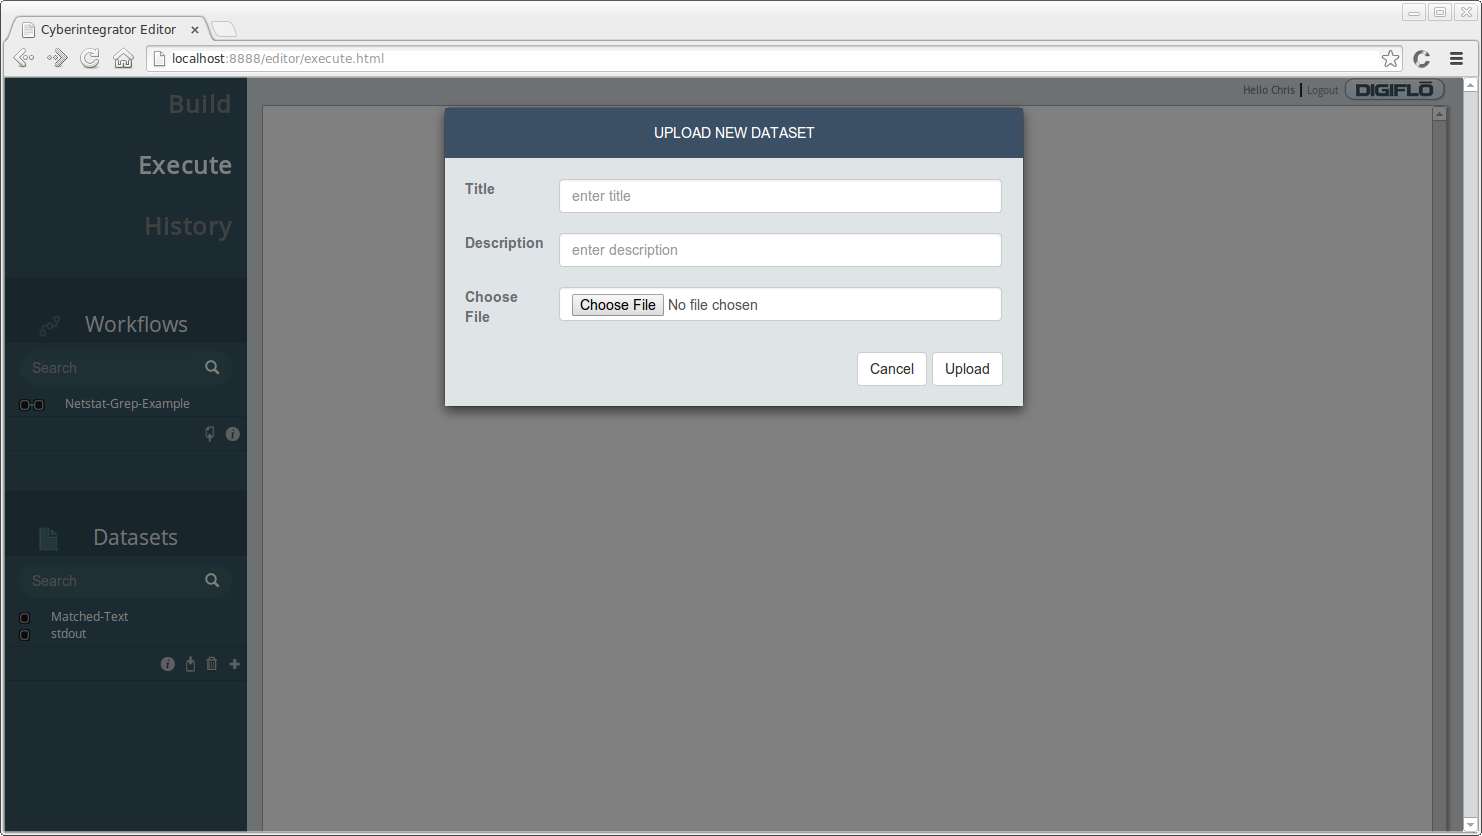
All you need to do is provide a title, short description and select the file to import. Once this is complete, the dataset is available for workflow tools that require it as input.
## Miscellaneous
### Reporting Bugs and Submitting Feature Requests
If you find software bugs or have feature requests for Data Wolf, please open a bug report in JIRA: https://opensource.ncsa.illinois.edu/jira/browse/WOLF. This is the best way to get things fixed and communicate with developers that are active on the project.
### Source Code
Data Wolf is an open source project and you can obtain the source code from our Git repository : https://opensource.ncsa.illinois.edu/stash/projects/WOLF. We welcome additional contributors on the project and would help in any way we can to assist you with making contributions to the project. If you are going to contribute and can make the feature available as open source, please open bug reports in JIRA (above) so we know that there is a feature you would like to see in the software and so we can help you implement the new feature.
### Acknowledgments
We would like to acknowledge multiple funding agencies for the support including NCSA, NSF, NASA, NARA and TRECC. The main creators of Data Wolf are Rob Kooper, Luigi Marini, Chris Navarro, Jong Lee, and Liana Diesendruck with support from Peter Bajcsy, Barbara Minsker, Jim Myers, and Tim Nee.