...
Configuring the Agent
Create a file called vault-agent-config.hcl:
| Code Block | ||||
|---|---|---|---|---|
| ||||
exit_after_auth = true
pid_file = "/home/vault/pidfile"

auto_auth {
    method "kubernetes" {
        mount_path = "auth/kubernetes"
        config = {
            role = "example"
        }
    }

    sink "file" {
        config = {
            path = "/home/vault/.vault-token"
        }
    }
} |
Notice that the Vault Agent Auto-Auth is configured to use the kubernetes auth method enabled at the auth/kubernetes path on the Vault server. The Vault Agent will use the example role to authenticate.
The sink block specifies the location on disk where to write tokens. Vault Agent Auto-Auth sink can be configured multiple times if you want Vault Agent to place the token into multiple locations. In this example, the sink is set to /home/vault/.vault-token.
Create a Consul Template
Vault uses Consul under the hood to persist its key-value pairs. Consul is a service mesh for Kubernetes that provides convenient ways to plug data into running pods.
NOTE: Consul is outside of the scope of this document. For more about Consul, see https://medium.com/velotio-perspectives/a-practical-guide-to-hashicorp-consul-part-1-5ee778a7fcf4
We can leverage Consul to create a template called consul-template-config.hcl:
| Code Block | ||||
|---|---|---|---|---|
| ||||
vault {
  renew_token = false
  vault_agent_token_file = "/home/vault/.vault-token"
  retry {
    backoff = "1s"
  }
}

template {
  destination = "/etc/secrets/index.html"
  contents = <<EOH
  <html>
  <body>
  <p>Some secrets:</p>
  {{- with secret "secret/myapp/config" }}
  <ul>
  <li><pre>username: {{ .Data.username }}</pre></li>
  <li><pre>password: {{ .Data.password }}</pre></li>
  </ul>
  {{ end }}
  </body>
  </html>
  EOH
} |
This template reads secrets at the secret/myapp/config path and set the username and password values.
NOTE: If the secret/ path is enabled with key/value v2 secrets engine, the templatized expressions should be modified as follow (Line 15 through 18):
| Code Block | ||
|---|---|---|
| ||
...
template {
  ...
  {{- with secret "secret/data/myapp/config?version=1" }}
  <ul>
  <li><pre>username: {{ .Data.data.username }}</pre></li>
  <li><pre>password: {{ .Data.data.password }}</pre></li>
  </ul>
  {{ end }}
  ...
} |
Create a ConfigMap
Place the two files you just created into a new directory called ./config-k8s and run the following commands to create a ConfigMap from them:
| Code Block | ||
|---|---|---|
| ||
# Create a ConfigMap called 'example-vault-agent-config'
$ kubectl create configmap example-vault-agent-config --from-file=./configs-k8s/

# View the created ConfigMap
$ kubectl get configmap example-vault-agent-config -o yaml |
Now create a pod spec anmed example-k8s-spec.yml that mounts in the files from the examplevault-agent-config ConfigMap and using the vault-auth ServiceAccount:
| Code Block | ||
|---|---|---|
| ||
---
apiVersion: v1
kind: Pod
metadata:
  name: vault-agent-example
spec:
  serviceAccountName: vault-auth

  restartPolicy: Never

  volumes:
    - name: vault-token
      emptyDir:
        medium: Memory

    - name: config
      configMap:
        name: example-vault-agent-config
        items:
          - key: vault-agent-config.hcl
            path: vault-agent-config.hcl

          - key: consul-template-config.hcl
            path: consul-template-config.hcl

    - name: shared-data
      emptyDir: {}

  initContainers:
    # Vault container
    - name: vault-agent-auth
      image: vault

      volumeMounts:
        - name: config
          mountPath: /etc/vault
        - name: vault-token
          mountPath: /home/vault

      # This assumes Vault running on local host and K8s running in Minikube using VirtualBox
      env:
        - name: VAULT_ADDR
          value: http://10.0.2.2:8200

      # Run the Vault agent
      args:
        [
          "agent",
          "-config=/etc/vault/vault-agent-config.hcl",
          #"-log-level=debug",
        ]

  containers:
    # Consul Template container
    - name: consul-template
      image: hashicorp/consul-template:alpine
      imagePullPolicy: Always

      volumeMounts:
        - name: vault-token
          mountPath: /home/vault

        - name: config
          mountPath: /etc/consul-template

        - name: shared-data
          mountPath: /etc/secrets

      env:
        - name: HOME
          value: /home/vault

        - name: VAULT_ADDR
          value: http://10.0.2.2:8200

      # Consul-Template looks in $HOME/.vault-token, $VAULT_TOKEN, or -vault-token (via CLI)
      args:
        [
          "-config=/etc/consul-template/consul-template-config.hcl",
          #"-log-level=debug",
        ]

    # Nginx container
    - name: nginx-container
      image: nginx

      ports:
        - containerPort: 80

      volumeMounts:
        - name: shared-data
mountPath: /usr/share/nginx/html |
Execute the following command to create the vault-agent-example Pod:
| Code Block | ||
|---|---|---|
| ||
$ kubectl apply -f example-k8s-spec.yml --record |
It will take a minute or so for the Pod to become fully up and running.
Verification
Open a port-forward so you can connect to the client from browser:
| Code Block | ||
|---|---|---|
| ||
$ kubectl port-forward pod/vault-agent-example 8080:80 |
In a web browser, go to localhost:8080
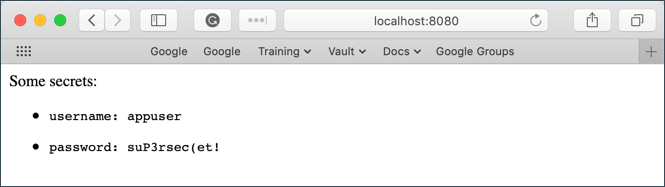
Notice that the username and password values were successfully read from secret/myapp/config.
This proves that we are able to capture Vault values and automatically render them at container startup using Consul.
Open a shell to the consul-template container:
| Code Block | ||
|---|---|---|
| ||
$ kubectl exec -it vault-agent-example --container consul-template sh |
Remember that we set the Vault Agent's sink to be /home/vault/.vault-token. To view the token stored in the sink:
| Code Block | ||
|---|---|---|
| ||
/# echo $(cat /home/vault/.vault-token)
s.7MQZzFZxUTBQMrtfy98wTGkZ |
This proves that our Vault token is being properly written to the sink.
Even without integrating directly with Consul, this pattern would allow us to use the Vault token within the container to access a Vault's contents!