Introduction
This document assumes basic familiarity with running containers using Docker and Kubernetes.
Interactive Tutorials for Docker
- https://www.katacoda.com/courses/docker
- https://training.play-with-docker.com/
- https://learndocker.online/demo
Interactive Tutorials for Kubernetes
- https://www.katacoda.com/courses/kubernetes
- https://kubernetes.io/docs/tutorials/kubernetes-basics/
- https://kubernetesbootcamp.github.io/kubernetes-bootcamp/
- https://labs.play-with-k8s.com/
What are Secrets?
Sounds great... what's the problem?
What is Vault and how does it solve the problem?
Setup
Vault can run locally on your machine using the vault binary, or it can be run directly inside of your Kubernetes cluster using the Vault Helm Chart.
NOTE: Even if you plan on using the Helm deployment method, you may want to download and configure the vault binary anyway as it can be helpful for debugging or for checking on your Vault's status.
Helm Install (recommended)
Assuming you have a Kubernetes cluster up and running with Helm installed and configured, you need only run the following commands:
# Clone the chart repo
$ git clone https://github.com/hashicorp/vault-helm.git
$ cd vault-helm

# Checkout a tagged version
$ git checkout v0.1.2

# Run Helm
$ helm install --name vault --namespace kube-system .
...
NOTE: You can pass the --dry-run flag to helm install to simply print our the resources that will be created, instead of actually triggering their creation.
Verify that Vault is Running
You should now have a sealed vault running. You should see something like the following in the logs:
$ kubectl logs -f vault-0 -n kube-system
==> Vault server configuration:

             Api Address: http://10.37.0.7:8200
                     Cgo: disabled
         Cluster Address: https://10.37.0.7:8201
              Listener 1: tcp (addr: "[::]:8200", cluster address: "[::]:8201", max_request_duration: "1m30s", max_request_size: "33554432", tls: "disabled")
               Log Level: info
                   Mlock: supported: true, enabled: true
                 Storage: file
                 Version: Vault v1.2.2

==> Vault server started! Log data will stream in below:

2019-11-05T19:42:37.448Z [INFO]  core: seal configuration missing, not initialized
2019-11-05T19:42:40.439Z [INFO]  core: seal configuration missing, not initialized
2019-11-05T19:42:43.369Z [INFO]  core: seal configuration missing, not initialized
2019-11-05T19:42:46.420Z [INFO]  core: seal configuration missing, not initialized
2019-11-05T19:42:49.215Z [INFO]  core: seal configuration missing, not initialized
    ...    ...    ...    ...    ...    ...    ...    ...    ...    ...    ...
Managing the Vault Server
You should then be able to open a port-forward using kubectl to the Vault pod:
$ kubectl port-forward vault-0 8200:8200
As long as this port-forward is running, navigating your browser to http://localhost:8200 should allow you to view the Vault UI.
Similarly, pointing your vault binary at http://localhost:8200 over the port-forward will allow you to run vault status to view the cluster status.
If you just need to run the vault command-line tool, you could choose instead to kubectl exec into the vault pod to run the command there:
$ kubectl exec -it -n kube-system vault-0 -- vault status
NOTE: For larger Vault cluster, configuring Vault to be exposed via a Kubernetes Service may be preferential.
Unsealing the Vault
By default, the Helm chart starts the Vault in a Sealed and uninitialized state. To use the vault you will first need to initialize it, then unseal it.
Initialization will create the keys needed for unsealing. SAVE THESE KEYS SOMEWHERE SAFE!
$ kubectl exec -it vault-0 -n kube-system -- vault operator init
Unseal Key 1: qGDqGX13Sy/G6E+ZuQZ9DvhoFV7PDYfpPDO7uv1ox1qI
Unseal Key 2: EFfPzYkeowIZRqVoV2Dg9SeQmfj0Hi33CBjAy2Zq1T/9
Unseal Key 3: j13UH+mdrOE+3bwBVOdv/YUKjTyrSNRDUaZykx7aFQRv
Unseal Key 4: mwA47fXNmdv8u2nXL8s2poi1oqjfGNPNMc6aGG5j1S2m
Unseal Key 5: 0TQ42RgTH+xiKguZiIsg5ttrGuZ5gy3xAqY7G6QjRns4

Initial Root Token: s.JyaDk0IiYveqHiXJAmhdJ9Es

Vault initialized with 5 key shares and a key threshold of 3. Please securely
distribute the key shares printed above. When the Vault is re-sealed,
restarted, or stopped, you must supply at least 3 of these keys to unseal it
before it can start servicing requests.

Vault does not store the generated master key. Without at least 3 key to
reconstruct the master key, Vault will remain permanently sealed!

It is possible to generate new unseal keys, provided you have a quorum of
existing unseal keys shares. See "vault operator rekey" for more information.
Now that you have the keys, you can unseal the vault!
As described in the output above, you will need to enter 3 of the 5 unseal keys to successfully unseal the Vault:
$ kubectl exec -it vault-0 -n kube-system -- vault operator unseal
Unseal Key (will be hidden): <paste-from-above>
Key                Value
---                -----
Seal Type          shamir
Initialized        true
Sealed             true    <---- Sealed
Total Shares       5
Threshold          3
Unseal Progress    1/3     <----
Unseal Nonce       0ed7cb42-66ad-63b2-fb42-36410f93b6b1
Version            1.2.2
HA Enabled         false

$ kubectl exec -it vault-0 -n kube-system -- vault operator unseal
Unseal Key (will be hidden): <paste-from-above>
Key                Value
---                -----
Seal Type          shamir
Initialized        true
Sealed             true    <---- Sealed
Total Shares       5
Threshold          3
Unseal Progress    2/3     <----
Unseal Nonce       0ed7cb42-66ad-63b2-fb42-36410f93b6b1
Version            1.2.2
HA Enabled         false

$ kubectl exec -it vault-0 -n kube-system -- vault operator unseal
Unseal Key (will be hidden): <paste-from-above>
Key             Value
---             -----
Seal Type       shamir
Initialized     true
Sealed          false      <---- Unsealed
Total Shares    5
Threshold       3
Version         1.2.2
Cluster Name    vault-cluster-0959e8a7
Cluster ID      60657f4c-55fb-0bb5-d511-9dc9e32f5eb6
HA Enabled      false
Check back on the logs to see the Vault initialized and unsealed:
2019-11-05T20:09:13.461Z [INFO]  core: seal configuration missing, not initialized
2019-11-05T20:09:16.399Z [INFO]  core: seal configuration missing, not initialized
2019-11-05T20:09:19.344Z [INFO]  core: seal configuration missing, not initialized
2019-11-05T20:09:22.511Z [INFO]  core: seal configuration missing, not initialized
2019-11-05T20:09:23.338Z [INFO]  core: security barrier not initialized
2019-11-05T20:09:23.539Z [INFO]  core: security barrier initialized: shares=5 threshold=3
2019-11-05T20:09:23.748Z [INFO]  core: post-unseal setup starting
2019-11-05T20:09:23.849Z [INFO]  core: loaded wrapping token key
2019-11-05T20:09:23.849Z [INFO]  core: successfully setup plugin catalog: plugin-directory=
2019-11-05T20:09:23.850Z [INFO]  core: no mounts; adding default mount table
2019-11-05T20:09:23.988Z [INFO]  core: successfully mounted backend: type=cubbyhole path=cubbyhole/
2019-11-05T20:09:23.989Z [INFO]  core: successfully mounted backend: type=system path=sys/
2019-11-05T20:09:23.990Z [INFO]  core: successfully mounted backend: type=identity path=identity/
2019-11-05T20:09:24.553Z [INFO]  core: successfully enabled credential backend: type=token path=token/
2019-11-05T20:09:24.553Z [INFO]  core: restoring leases
2019-11-05T20:09:24.553Z [INFO]  rollback: starting rollback manager
2019-11-05T20:09:24.556Z [INFO]  expiration: lease restore complete
2019-11-05T20:09:24.661Z [INFO]  identity: entities restored
2019-11-05T20:09:24.662Z [INFO]  identity: groups restored
2019-11-05T20:09:24.662Z [INFO]  core: post-unseal setup complete
2019-11-05T20:09:24.966Z [INFO]  core: root token generated
2019-11-05T20:09:24.966Z [INFO]  core: pre-seal teardown starting
2019-11-05T20:09:24.966Z [INFO]  rollback: stopping rollback manager
2019-11-05T20:09:24.966Z [INFO]  core: pre-seal teardown complete
2019-11-05T20:09:59.450Z [INFO]  core.cluster-listener: starting listener: listener_address=[::]:8201
2019-11-05T20:09:59.450Z [INFO]  core.cluster-listener: serving cluster requests: cluster_listen_address=[::]:8201
2019-11-05T20:09:59.454Z [INFO]  core: post-unseal setup starting
2019-11-05T20:09:59.457Z [INFO]  core: loaded wrapping token key
2019-11-05T20:09:59.457Z [INFO]  core: successfully setup plugin catalog: plugin-directory=
2019-11-05T20:09:59.463Z [INFO]  core: successfully mounted backend: type=system path=sys/
2019-11-05T20:09:59.464Z [INFO]  core: successfully mounted backend: type=identity path=identity/
2019-11-05T20:09:59.464Z [INFO]  core: successfully mounted backend: type=cubbyhole path=cubbyhole/
2019-11-05T20:09:59.480Z [INFO]  core: successfully enabled credential backend: type=token path=token/
2019-11-05T20:09:59.480Z [INFO]  core: restoring leases
2019-11-05T20:09:59.480Z [INFO]  rollback: starting rollback manager
2019-11-05T20:09:59.481Z [INFO]  expiration: lease restore complete
2019-11-05T20:09:59.485Z [INFO]  identity: entities restored
2019-11-05T20:09:59.485Z [INFO]  identity: groups restored
2019-11-05T20:09:59.485Z [INFO]  core: post-unseal setup complete
2019-11-05T20:09:59.485Z [INFO]  core: vault is unsealed
You are now ready to store and retrieve secrets from the Vault! Let's try manually storing some secrets to learn the basics.
Local Install
A local install has a few more manual steps to get things running on Kubernetes.
Download the vault binary and run vault server -dev .
NOTE: For production setups, leave off the -dev flag. Developer mode is far less secure, providing an unsealed Vault by default and requiring less keys to unseal in the future.
WARNING! dev mode is enabled! In this mode, Vault runs entirely in-memory
and starts unsealed with a single unseal key. The root token is already
authenticated to the CLI, so you can immediately begin using Vault.
Once the dev server is up and running, MAKE SURE that you do the following
Launch a new terminal session.
Copy and run the
export VAULT_ADDR ...command from the terminal output. This will configure the Vault client to talk to our dev server.Save the unseal key somewhere. Don't worry about how to save this securely. For now, just save it anywhere.
Copy the generated Root Token value and set is as
VAULT_DEV_ROOT_TOKEN_IDenvironment variable:$ export VAULT_DEV_ROOT_TOKEN_ID="s.SomeLongStringThatIsUniqueToYourVault"
You now have a running/unsealed dev Vault. Let's try manually storing some secrets to learn the basics.
Learning the Basics
Storing and Retrieving Secrets
Vault offers an excellent "first steps" tutorial that walks you through reading and writing secrets to the Vault: https://learn.hashicorp.com/vault/getting-started/first-secret
You can put one or more key-value pairs to a Vault secret using the vault kv put command:
$ vault kv put secret/hello foo=world exciting=yes
Key              Value
---              -----
created_time     2019-10-30T16:42:05.269502Z
deletion_time    n/a
destroyed        false
version          2
You can retrieve these values again using vault kv get:
$ vault kv get secret/hello
====== Metadata ======
Key              Value
---              -----
created_time     2019-10-30T16:42:05.269502Z
deletion_time    n/a
destroyed        false
version          2

=== Data ===
Key    Value
---    -----
excited    yes
foo        world
Working with Secrets Engines
See https://learn.hashicorp.com/vault/getting-started/secrets-engines
Our above examples worked fine for secret/hello, but what if we attempt to change this to someotherpath/hello?
$ vault kv put someotherpath/hello foo=world
Error making API request.

URL: GET http://127.0.0.1:8200/v1/sys/internal/ui/mounts/someotherpath/hello
Code: 403. Errors:

* preflight capability check returned 403, please ensure client's policies grant access to path "someotherpath/hello/"
This is because we don't have a secrets engine enabled that matches someotherpath/. A secrets engine is Vault's way of writing these secrets to the underlying filesystem. This way, we don't need to worry about proper file formats or manually ingesting values.
To see all of the currently-enabled secrets engines, you can use vault secrets list:
$ vault secrets list
Path          Type         Accessor              Description
----          ----         --------              -----------
cubbyhole/    cubbyhole    cubbyhole_d1212f15    per-token private secret storage
identity/     identity     identity_910c214b     identity store
secret/       kv           kv_19353bba           key/value secret storage
sys/          system       system_c58ea5a1       system endpoints used for control, policy and debugging
To enable a new secrets engine:
$ vault secrets enable -path=kv/ kv
Success! Enabled the kv secrets engine at: kv/

$ vault secrets list
Path          Type         Accessor              Description
----          ----         --------              -----------
cubbyhole/    cubbyhole    cubbyhole_d1212f15    per-token private secret storage
identity/     identity     identity_910c214b     identity store
kv/           kv           kv_aa513af3           n/a
secret/       kv           kv_19353bba           key/value secret storage
sys/          system       system_c58ea5a1       system endpoints used for control, policy and debugging
We are now able to store values prefixed with kv/ or whatever path was provided when enabling the secrets engine:
$ vault write kv/my-secret value="s3c(eT"
Success! Data written to: kv/my-secret

$ vault write kv/hello target=world
Success! Data written to: kv/hello

$ vault write kv/airplane type=boeing class=787
Success! Data written to: kv/airplane

$ vault list kv
Keys
----
airplane
hello
my-secret
We can disable a secrets engine using a similar syntax:
$ vault secrets disable kv/
Success! Disabled the secrets engine (if it existed) at: kv/
For a list of all available secrets engines, please see the Vault documentation regarding Secrets Engines.
Managing Users and Policies
By default, you are authenticated into the dev cluster as the admin user - this user can access all paths regardless of the policies set.
The admin defines a set of paths that other users should be able to access and assigns a list of capabilities (verbs) that a user is allowed to perform on that path.
Create a read-only policy for a particular key or set of keys and write some test keys to it as the admin user:
# Create a policy file, myapp-kv-ro.hcl
$ tee myapp-kv-ro.hcl <<EOF
# If working with K/V v1
path "secret/myapp/*" {
    capabilities = ["read", "list"]
}

# If working with K/V v2
path "secret/data/myapp/*" {
    capabilities = ["read", "list"]
}
EOF

# Create a policy named myapp-kv-ro
$ vault policy write myapp-kv-ro myapp-kv-ro.hcl

# Write some test keys as the admin user
$ vault kv put secret/myapp/config username='appuser' \
        password='suP3rsec(et!' \
        ttl='30s'
Enable the userpass auth method, then create and login as a new test user:
# Enable userpass auth method
$ vault auth enable userpass

# Create a user named "test-user"
$ vault write auth/userpass/users/test-user \
        password=training \
        policies=myapp-kv-ro

# Login as test-user
$ vault login -method=userpass \
        username=test-user \
        password=training
We can now test that our policy is working as we have defined. Try to read from, then write to secret/myapp/config and you should see that your request is denied with a 403 - this means that our policy is working correctly!
# Verify that test-user can read secret/myapp path, as policy has written
$ vault kv get secret/myapp/config
====== Metadata ======
Key              Value
---              -----
created_time     2019-10-29T20:52:41.15247Z
deletion_time    n/a
destroyed        false
version          1

====== Data ======
Key         Value
---         -----
password    suP3rsec(et!
ttl         30s
username    appuser

# Verify that test-user CANNOT write secret/myapp path, as policy has written
$ vault kv put secret/myapp/config another=one
Error writing data to secret/data/myapp/config: Error making API request.

URL: PUT http://127.0.0.1:8200/v1/secret/data/myapp/config
Code: 403. Errors:

* 1 error occurred:
	* permission denied
After testing the policy, you will need to log back into the privileged user to configure Kubernetes auth:
# Log back in using the token you saved from Vault's startup logs
$ vault login ${VAULT_DEV_ROOT_TOKEN_ID}
Vault Agent for Kubernetes
The next step is to configure Vault's Kubernetes authentication method.
See https://www.vaultproject.io/docs/auth/kubernetes.html#configuration
See https://learn.hashicorp.com/vault/identity-access-management/vault-agent-k8s
First, configure a ServiceAccount in Kubernetes that Vault will use to authenticate:
# Create a service account called 'vault-auth'
$ kubectl create serviceaccount vault-auth

# Write a set of permissions for the service account
$ cat vault-auth-service-account.yml
  ---
  apiVersion: rbac.authorization.k8s.io/v1beta1
  kind: ClusterRoleBinding
  metadata:
    name: role-tokenreview-binding
    namespace: default
  roleRef:
    apiGroup: rbac.authorization.k8s.io
    kind: ClusterRole
    name: system:auth-delegator
  subjects:
  - kind: ServiceAccount
    name: vault-auth
    namespace: default

# Update the vault-auth service account with the new permissions
$ kubectl apply --filename vault-auth-service-account.yml
If you are running locally, you will also need to point Vault at your Kubernetes cluster. In the Helm Chart case, this should already be done for you.
# Set VAULT_SA_NAME to the service account you created earlier
$ export VAULT_SA_NAME=$(kubectl get sa vault-auth -o jsonpath="{.secrets[*]['name']}")

# Set SA_JWT_TOKEN value to the service account JWT used to access the TokenReview API
$ export SA_JWT_TOKEN=$(kubectl get secret $VAULT_SA_NAME -o jsonpath="{.data.token}" | base64 --decode; echo)

# Set SA_CA_CRT to the PEM encoded CA cert used to talk to Kubernetes API
$ export SA_CA_CRT=$(kubectl get secret $VAULT_SA_NAME -o jsonpath="{.data['ca\.crt']}" | base64 --decode; echo)

# Set K8S_HOST to minikube or master IP address
$ export K8S_HOST=$(minikube ip)
Now we are ready to enable the Kubernetes auth method:
# Enable the Kubernetes auth method at the default path ("auth/kubernetes")
$ vault auth enable kubernetes

# Tell Vault how to communicate with the Kubernetes cluster
$ vault write auth/kubernetes/config \
        token_reviewer_jwt="$SA_JWT_TOKEN" \
        kubernetes_host="https://$K8S_HOST:8443" \
        kubernetes_ca_cert="$SA_CA_CRT"

# Create a role named 'example' to map Kubernetes ServiceAccount to Vault policies and default token TTL
$ vault write auth/kubernetes/role/example \
        bound_service_account_names=vault-auth \
        bound_service_account_namespaces=default \
        policies=myapp-kv-ro \
        ttl=24h
Test That it Works
Run a simple pod:
$ kubectl run --generator=run-pod/v1 tmp --rm -i --tty --serviceaccount=vault-auth --image alpine:3.7
Once inside the container, install curl and jq:
/# apk update
/# apk add curl jq
Verify that you can communicate with the Vault cluster and you should see output similar to the following:
/# VAULT_ADDR=http://10.0.2.2:8200

/# curl -s $VAULT_ADDR/v1/sys/health | jq
{
  "initialized": true,
  "sealed": false,
  "standby": false,
  "performance_standby": false,
  "replication_performance_mode": "disabled",
  "replication_dr_mode": "disabled",
  "server_time_utc": 1543969628,
  "version": "1.0.0+ent",
  "cluster_name": "vault-cluster-e314942e",
  "cluster_id": "2b4f6213-d58f-0530-cf07-65ea467181f2"
}
NOTE: Be sure to set VAULT_ADDR to where your Vault server is running if it's NOT running locally.
Set KUBE_TOKEN to the service account token value:
/# KUBE_TOKEN=$(cat /var/run/secrets/kubernetes.io/serviceaccount/token)
/# echo $KUBE_TOKEN
Now, test the kubernetes auth method to ensure that you can authenticate with Vault:
/# curl --request POST \
        --data '{"jwt": "'"$KUBE_TOKEN"'", "role": "example"}' \
        $VAULT_ADDR/v1/auth/kubernetes/login | jq
{
  ...
  "auth": {
    "client_token": "s.7cH83AFIdmXXYKsPsSbeESpp",
    "accessor": "8bmYWFW5HtwDHLAoxSiuMZRh",
    "policies": [
      "default",
      "myapp-kv-ro"
    ],
    "token_policies": [
      "default",
      "myapp-kv-ro"
    ],
    "metadata": {
      "role": "example",
      "service_account_name": "vault-auth",
      "service_account_namespace": "default",
      "service_account_secret_name": "vault-auth-token-vqqlp",
      "service_account_uid": "adaca842-f2a7-11e8-831e-080027b85b6a"
    },
    "lease_duration": 86400,
    "renewable": true,
    "entity_id": "2c4624f1-29d6-972a-fb27-729b50dd05e2",
    "token_type": "service"
  }
}
Notice that client_token is successfully generated and myapp-kv-ro policy is attached with the token. The metadata displays that its service account name (service_account_name) is vault-auth.
Vault Agent Auto-Auth
Configuring the Agent
Create a file called vault-agent-config.hcl:
exit_after_auth = true
pid_file = "/home/vault/pidfile"

auto_auth {
    method "kubernetes" {
        mount_path = "auth/kubernetes"
        config = {
            role = "example"
        }
    }

    sink "file" {
        config = {
            path = "/home/vault/.vault-token"
        }
    }
}
Notice that the Vault Agent Auto-Auth is configured to use the kubernetes auth method enabled at the auth/kubernetes path on the Vault server. The Vault Agent will use the example role to authenticate.
The sink block specifies the location on disk where to write tokens. Vault Agent Auto-Auth sink can be configured multiple times if you want Vault Agent to place the token into multiple locations. In this example, the sink is set to /home/vault/.vault-token.
Create a Consul Template
Vault uses Consul under the hood to persist its key-value pairs. Consul is a service mesh for Kubernetes that provides convenient ways to plug data into running pods.
NOTE: Consul is outside of the scope of this document. For more about Consul, see https://medium.com/velotio-perspectives/a-practical-guide-to-hashicorp-consul-part-1-5ee778a7fcf4
We can leverage Consul to create a template called consul-template-config.hcl:
vault {
  renew_token = false
  vault_agent_token_file = "/home/vault/.vault-token"
  retry {
    backoff = "1s"
  }
}

template {
  destination = "/etc/secrets/index.html"
  contents = <<EOH
  <html>
  <body>
  <p>Some secrets:</p>
  {{- with secret "secret/myapp/config" }}
  <ul>
  <li><pre>username: {{ .Data.username }}</pre></li>
  <li><pre>password: {{ .Data.password }}</pre></li>
  </ul>
  {{ end }}
  </body>
  </html>
  EOH
}
This template reads secrets at the secret/myapp/config path and set the username and password values.
NOTE: If the secret/ path is enabled with key/value v2 secrets engine, the templatized expressions should be modified as follow (Line 15 through 18):
...
template {
  ...
  {{- with secret "secret/data/myapp/config?version=1" }}
  <ul>
  <li><pre>username: {{ .Data.data.username }}</pre></li>
  <li><pre>password: {{ .Data.data.password }}</pre></li>
  </ul>
  {{ end }}
  ...
}
Create a ConfigMap
Place the two files you just created into a new directory called ./config-k8s and run the following commands to create a ConfigMap from them:
# Create a ConfigMap called 'example-vault-agent-config'
$ kubectl create configmap example-vault-agent-config --from-file=./configs-k8s/

# View the created ConfigMap
$ kubectl get configmap example-vault-agent-config -o yaml
Now create a pod spec named example-k8s-spec.yml that mounts in the files from the examplevault-agent-config ConfigMap and using the vault-auth ServiceAccount:
---
apiVersion: v1
kind: Pod
metadata:
  name: vault-agent-example
spec:
  serviceAccountName: vault-auth

  restartPolicy: Never

  volumes:
    - name: vault-token
      emptyDir:
        medium: Memory

    - name: config
      configMap:
        name: example-vault-agent-config
        items:
          - key: vault-agent-config.hcl
            path: vault-agent-config.hcl

          - key: consul-template-config.hcl
            path: consul-template-config.hcl

    - name: shared-data
      emptyDir: {}

  initContainers:
    # Vault container
    - name: vault-agent-auth
      image: vault

      volumeMounts:
        - name: config
          mountPath: /etc/vault
        - name: vault-token
          mountPath: /home/vault

      # This assumes Vault running on local host and K8s running in Minikube using VirtualBox
      env:
        - name: VAULT_ADDR
          value: http://10.0.2.2:8200

      # Run the Vault agent
      args:
        [
          "agent",
          "-config=/etc/vault/vault-agent-config.hcl",
          #"-log-level=debug",
        ]

  containers:
    # Consul Template container
    - name: consul-template
      image: hashicorp/consul-template:alpine
      imagePullPolicy: Always

      volumeMounts:
        - name: vault-token
          mountPath: /home/vault

        - name: config
          mountPath: /etc/consul-template

        - name: shared-data
          mountPath: /etc/secrets

      env:
        - name: HOME
          value: /home/vault

        - name: VAULT_ADDR
          value: http://10.0.2.2:8200

      # Consul-Template looks in $HOME/.vault-token, $VAULT_TOKEN, or -vault-token (via CLI)
      args:
        [
          "-config=/etc/consul-template/consul-template-config.hcl",
          #"-log-level=debug",
        ]

    # Nginx container
    - name: nginx-container
      image: nginx

      ports:
        - containerPort: 80

      volumeMounts:
        - name: shared-data
          mountPath: /usr/share/nginx/html
Execute the following command to create the vault-agent-example Pod:
$ kubectl apply -f example-k8s-spec.yml --record
It will take a minute or so for the Pod to become fully up and running.
Verification
Open a port-forward so you can connect to the client from browser:
$ kubectl port-forward pod/vault-agent-example 8080:80
In a web browser, go to localhost:8080
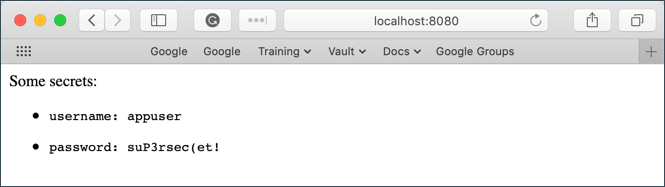
Notice that the username and password values were successfully read from secret/myapp/config.
This proves that we are able to capture Vault values and automatically render them at container startup using Consul.
Open a shell to the consul-template container:
$ kubectl exec -it vault-agent-example --container consul-template sh
Remember that we set the Vault Agent's sink to be /home/vault/.vault-token. To view the token stored in the sink:
/# echo $(cat /home/vault/.vault-token)
s.7MQZzFZxUTBQMrtfy98wTGkZ
This proves that our Vault token is being properly written to the sink.
Even without integrating directly with Consul, this pattern would allow us to use the Vault token within the container to access a Vault's contents!