...
The main steps:
- Wrap the tool for use as an extractor in Clowder (and through that Brown Dog)
- Dockerize the extractor
- Deploy the extractor
- Add the extractor to the tool catalogTools Catalog
A few assumptions are that you have a tool that extracts some kind of metadata from a file or dataset and that you have installed Python, Git, and Docker as well as any other specific software needed by your extractor (if any) on your computer.
Install pyClowder2, which is a Python library that helps to easily communicate with Clowder - the backend services of Brown Dog which handles extractions. The advantage of using this library is that it manages all communications with Clowder and RabbitMQ (the distributed messaging bus) and the developer doesn't have to take care of such tasks. Needless to say, an extractor can also be written in native Python without the use of pyClowder2, but it would be more time consuming.
Code Block theme Confluence pip install git+https://opensource.ncsa.illinois.edu/stash/scm/cats/pyclowder.git
Get your code together
. We have developed a template or example extractor written in Python. It is a simple wordcount extractor that counts lines, words, and characters in a text file. Clone the template extractor and rename the directory to an appropriate name that reflects the purpose of your extractor.Code Block theme Confluence git clone https://opensource.ncsa.illinois.edu/bitbucket/scm/bd/extractors-template.git mv extractors-template/ <your_extractor_name> cd <your_extractor_name>
Bring in your working python code. Make changes to extractors.py (main program). Consider the process_file method as the main method of an extractor and accordingly it needs to contain the main logic. You can call other methods in your python code from this method after importing necessary modules into this file.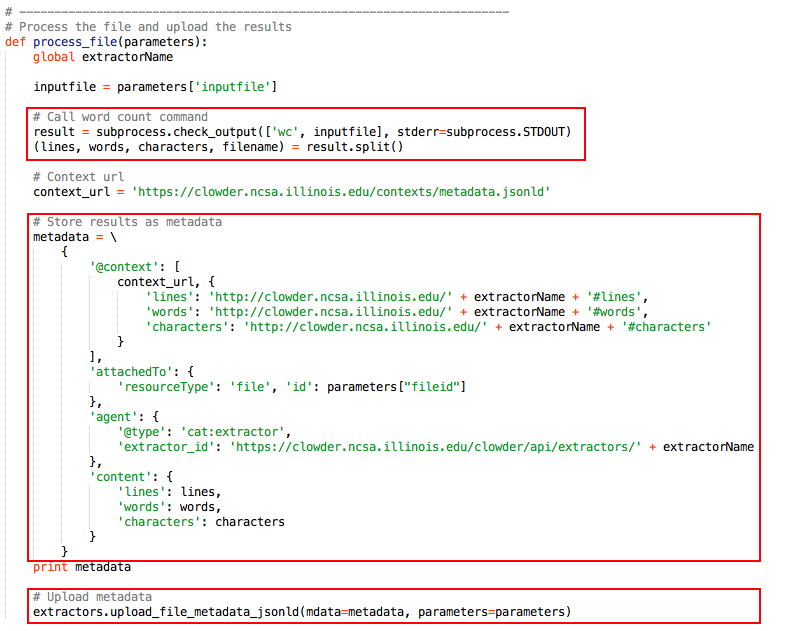
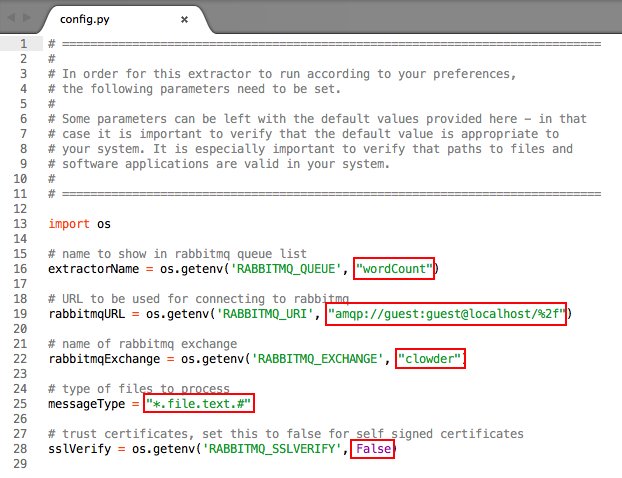
Edit extractor configuration file config.py:
Change the rabbitmq queue name - in this case replace "wordCount" with an appropriate name for your extractor
- Change the messageType field to reflect the MIME type(s) of the file for which you are writing the extractor
- Update other fields like rabbitmqURL, rabbitmqExchange, sslVerify, to include
- If your extractor needs other custom parameters, they need to be added to config.py
- Edit extractor.info.json
. This file contains metadata about the extractor in JSON-LD format. Update all relevant fields as needed.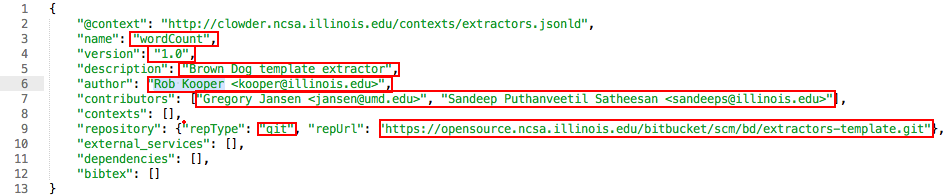
Update the Dockerfile
To to install your software dependencies, provide necessary instructions in Dockerfile using the RUN command. You will need to add a line in Dockerfile to switch to the root user (USER root) for getting proper permissions. For e.g., to install ImageMagick package using apt-get, add the following commands to Dockerfile:Code Block theme Confluence USER root RUN apt-get update && apt-get install -y imagemagick
Test Docker:
Code Block theme Confluence docker-compose up -d docker build -t <your_extractor_name> . docker run --rm -i -t --link <your_extractor_name_with_only_alphabets>_rabbitmq_1:rabbitmq <your_extractor_name>
You should see the following in the terminal. This means that the extractor is running and waiting for messages:
Code Block theme Confluence INFO : pyclowder.extractors - Waiting for messages. To exit press CTRL+C
...
Converters
In this section, we describe the creation of a converter using the image converter written using ImageMagick.
...