Here's How It Works
Fork Upstream Repository
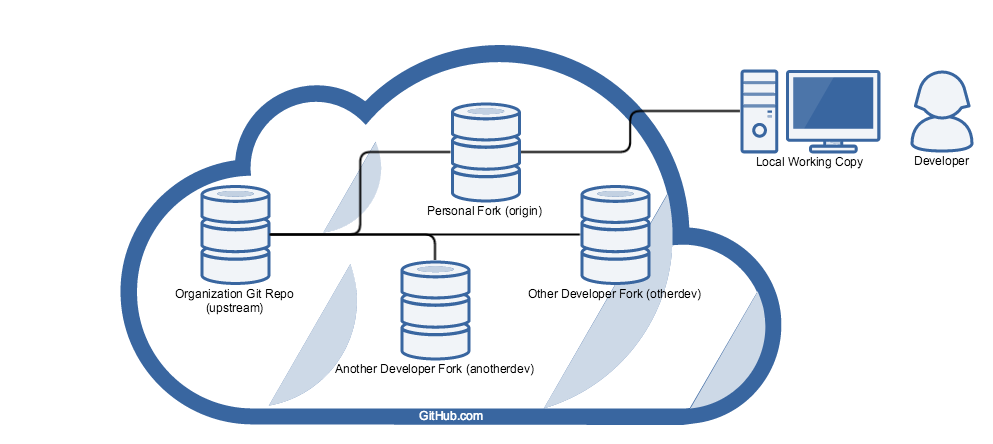
The premise is that each developer creates a fork of the nds-org (aka "upstream") source repository.
This can be accomplished by navigating to https://github.com/nds-org/nds-labs/tree/v2 and clicking on the "Fork" button at the top-right.
(You did create a GitHub account, didn't you? If not, see *New Developer Workflow.)

Clone from Origin Repository
The developer the can make any create or delete any branches they want on their own personal fork (aka "origin").
To make modifications to the code, the developer clones their origin repository.
This creates a local working copy of the code that is independent of your personal fork.
Cloning the repository (and specifying the "upstream repository") with the following commands:
git clone https://github.com/your-git-username/nds-labs.git
cd nds-labs/
git remote add upstream https://github.com/nds-org/nds-labs.git
Commit Local Modifications
Make sure if you create any new files that you want Git to track, call the following command:
git add <filename or regex>
Modify the code all you want and when you are ready to commit to your local copy:
git commit -a -m "Enter a short description of your commit here."
Any changes that they wish to contribute back to the upstream repository can be made in the form of a Pull Request.
An administrator can then review the pull request before merging it in, and may ask you to modify your pull request before they will do so.
Push Committed Changes to Your Origin
Once you have a few commits gathered, you'll likely want to save them indefinitely by pushing them back to your personal fork.
Pushing to your fork does several things for you:
- it allows you to preserve your code on GitHub.com indefinitely
- it encapsulates any branches that you have made in a repo that only you can administrate.
- it allows others to easily pull in your code remotely for integration testing - just as we added the "upstream" remote with the git remote command, we can add any other developer's personal fork
- it enables you to create a Pull Request back to the upstream repo, contributing changes back for us to review and incorporate
WARNING: BE SURE that you want to push whatever push whatever you push.
It is VERY DIFFICULT to remove things from GitHub.com safely once they are pushed there.
Contribute Back with Pull Requests
When you think you have a change that NDS would benefit from, feel free to contribute it back to our repository at https://github.com/nds-org/nds-labs.git in the form of a Pull Request.
To make a Pull Request, navigate to your forked repository: https://github.com/your-git-username/nds-labs.git and click one of the several "Pull Request" button to Create a New Pull Request.

You can choose the source and destination remote and branch from here, as well as name your PR and enter a short description if you'd like.
In general, we tend to name Pull Requests after JIRA tickets, if the issue we are addressing has one associated with it. For example: NDS-101: Summary of JIRA Ticket
In the description, I normally like to link to the JIRA ticket as well, if one exists.
Segment Feature Changes to Different Branches
Case: Mix of Live and Dead Code on the Same Branch
Case: Say you want to make a new addition to the code, so you create a fork and start coding right away.
You work for days and days on a new addition and fix some bugs along the way, only to find that your proposed addition is not going to work properly.
But half of the work you have done on the branch was bug fixed, which need to make their way back upstream.
Now you'll have to either manually roll back the additions you have made or do a git checkout or git reset and fix the same bugs again manually.
Avoiding the Same Fate
To avoid this situation, it is recommended to separate each additional feature or fix for each particular bug out to its own branch.
You can create and switch to a new branch with the following commands:
git branch new-branch-name
git checkout new-branch-name
OR in a single line:
git checkout -b new-branch-name
This way, you can make a PR for any modifications separately and once they are ready, instead of needing to manually roll back or redo changes.
Don't forget to switch back to the default/base branch when you are done.
NOTE: In general, we tend to name branches after the key of their associated JIRA tickets. For example: NDS-101
An aside: Branch Tracking
It is important to note that whichever branch you are currently on when executing git branch or git checkout -b will be "tracking branch" of your branch.
This means that your branch stemmed from the tracking branch, and any changes that were present on that branch are now present on yours.
This means that collaborating / integrating with another developer is as easy as creating a new branch, and pulling one or more sets of changes into it for integration testing.
If things go awry, you can always choose to blow away the branch altogether and try again.
Undoing your Last Commit
Locally
If you accidentally commit something you ought not have, but have not yet pushed the commit to your personal fork, run the following command to undo the commit:
git reset HEAD^
The ^ tells git to reset to "the previous commit before head." You can chain together multiple ^'s to go back to the nth previous commit, but I would not recommend this unless you know what you are doing.
On Personal Fork
If you have already pushed the change to your personal fork, then you may be out of luck.
If the mistaken change that you made on a separate branch, you can delete the branch from your GitHub.com fork, revert the change locally and then re-push the branch.
If you made the mistaken change to master, then the only option to remove it may be to delete your entire personal fork and re-fork the upstream repo.
WARNING: Make sure to have any outstanding Pull Requests MERGED before deleting your personal fork, or your changes may get lost.