This extractor would utilize pyClowder framework to handle simple check_message() and process_message() components, but with the chance to call an external function to do the actual extractor work.
Developers would write a function that takes an input or data (and probably the logger used by simple extractor) and returns a JSON dict with any new files, metadata, previews etc. that result from the function:
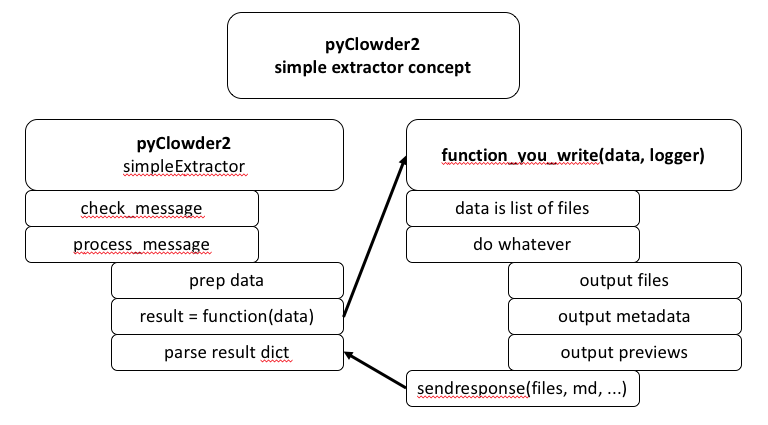
So here, the simple extractor would handle everything and call the configured function (configured on initialization) with the data to get a result, then parse the result in a standard way.
The result dict would have a structure that allows users to define outputs for their function:
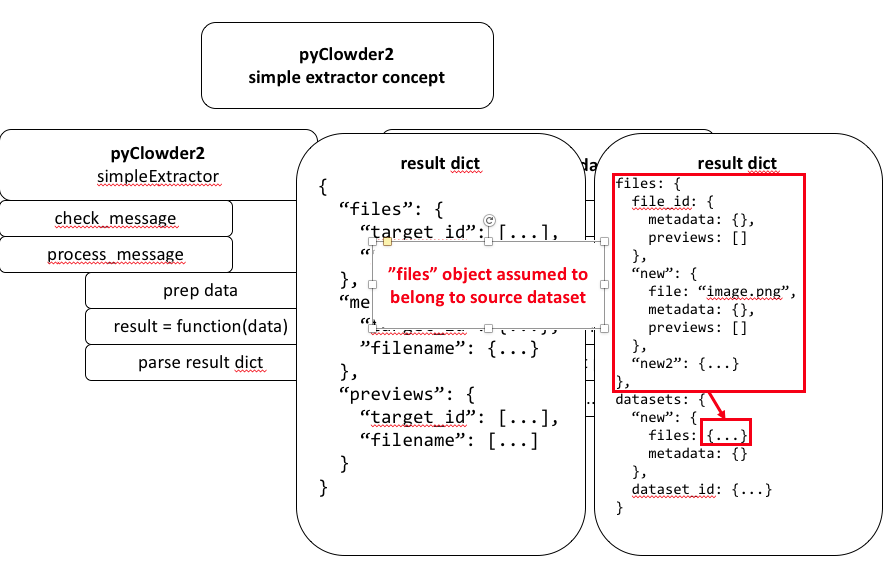
So in this example response object:
- "files" key has a dict with any files to be uploaded.
- using file_id as subkey allows uploading metadata and previews to existing file.
- using "new_123" or any "new" prefix key will result in new file created that can also include metadata and previews
- dict can include as many files as desired
- files in the "files" portion are assumed to belong to dataset that triggering input file belongs to.
- "datasets" key has a dict if the extractor needs to create NEW datasets, or upload files to datasets different the one that triggered the extractor
- "new" or "new_123..." will create a new dataset that can include files and dataset metadata.
- existing dataset ID will load files or metadata to that dataset.
- the "files" dict has same structure described above.
Big idea is to let developers simply write code to process an input file based on 2 parameters: the data and the logger.
At the end, it can call a sendrespose(files, metadata) function of some kind to auto build the dict for simple extractor to parse. We should think about this - maybe different sendresponse() functions if file vs. dataset extractor? Don't want users to have to build the JSON object themselves necessarily, although maybe they have to if the JSON object is complex and sendresponse() is just for basic responses?
Single File Extractor:
Writing an Extractor Using Simple Extractor Wrapper
Introduction
Clowder is an open-source research data management system that supports curation of long-tail data and metadata across multiple research domains and diverse data types. It uses a metadata extraction bus to perform data curation. Extractors are software programs that do the extraction of specific metadata from a file or dataset (a group of related files). The Simple Extractor Wrapper is a piece of software being developed to make the process of developing an extractor easier. This document will provide the details of writing an extractor program using the Simple Extractor Wrapper.
Goals of Simple Extractor Wrapper
An extractor can be written in any programming language as long as it can communicate with Clowder using a simple HTTP web service API and RabbitMQ. It can be hard to develop an extractor from the scratch when you also consider the code that is needed for this communication. To reduce this effort and to avoid code duplication, we created libraries written in Python (PyClowder) and Java (JClowder) to make the processing of writing extractors easy in these languages. We chose these languages since they are among the most popular ones and they continue to remain to so. Though this is the case, there is still some overhead in terms of developing an extractor using these libraries. In order to make the process of writing extractors even easier, we created a Simple Extractor Wrapper, that wraps around your existing Python source code and converts your code into an extractor. The main goal of this wrapper is to help create Python extractors with very minimal effort. As the name says, the extractor itself needs to be simple in nature. The extractor will process a file and generate metadata in JSON format and/or create a file preview. Any other Clowder API endpoints are not currently available through the Simple Extractor and the developer would have to fall back to using PyClowder, JClowder or writing the extractor from scratch.
Step-by-Step Instructions
Prerequisites
The step-by-step instructions to create an extractor using the Simple Extractor Wrapper assumes the following:
- Docker is installed on your computer. You can download and install Docker from https://www.docker.com/products/docker-desktop.
- You already have a piece of code written in Python that can process a file and generate metadata.
- The extractor that you are trying to create will only generate metadata in JSON format and/or a file preview.
- Your code has been tested and does what it is supposed to do.
- The main function of your Python program needs to accept the string format file path of the input file. It also needs to return a dictionary containing either metadata information ("metadata"), details about file previews ("previews") or both in the following format:
{"metadata": dict(),
"previews": array()
}
Instructions
Your extractor will contain several files. The ones that will be used by the Simple Extractor Wrapper are listed below. The instructions below will help you to create these files:
- my_python_program.py (required): For simplicity, let us call the Python file that contains the main function my_python_program.py, the main function my_main_function, and your extractor my_extractor.
extractor_info.json (required): Contains metadata about the extractor
Dockerfile (required): Contains instructions to create a docker image of your extractor
requirements.txt (optional): Contains names of Python packages that will be installed using the pip command.
packages.apt (optional): Contains names of Linux packages that will be installed using the apt-get command.
Create and save extractor_info.json using any text editor in your source directory. This file contains the metadata about the extractor that you are creating. Please fill in the relevant details about the extractor in this file. This document follows the JSON-LD standard. A template extractor_info.json has been provided below for reference. As you can see, you can fill in the details like name, version, author, contributors, source code repository, docker image name, the data types on which the extractor will work, external services used, any dependent libraries, BibTex format citation to a list of publications that the extractor is referring to, etc. An example extractor_info.json can be found here:
{ "@context": "<context root URL>", "name": "<extractor name>", "version": "<version number>", "description": "<extractor description>", "author": "<first name> <last name> <<email address>>", "contributors": [ "<first name> <last name> <<email address>>", "<first name> <last name> <<email address>>", ], "contexts": [ { "<metadata term 1>": "<URL definition of metadata term 1>", "<metadata term 2>": "<URL definition of metadata term 2>", } ], "repository": [ { "repType": "git", "repUrl": "<source code URL>" } ], "process": { "file": [ "<MIME type/subtype>", "<MIME type/subtype>" ] }, "external_services": [], "dependencies": [], "bibtex": [] }- Download the Docker Compose file from
- https://opensource.ncsa.illinois.edu/bitbucket/projects/CATS/repos/pyclowder2/raw/docker-compose.yml
You can also use curl command to download it from a terminal:
curl https://opensource.ncsa.illinois.edu/bitbucket/projects/CATS/repos/pyclowder2/raw/docker-compose.yml?at=refs%2Fheads%2FBD-2226-add-docker-compose-file-to-pyclowder2 --output docker-compose.yml
- https://opensource.ncsa.illinois.edu/bitbucket/projects/CATS/repos/pyclowder2/raw/docker-compose.yml
Start up the Clowder services stack (Clowder, RabbitMQ, MongoDB, and ElasticSearch) by running the following command from the directory containing the downloaded docker-compose.yml file. This may take a few minutes when running for the first time:
docker-compose up
Create and save a Dockerfile in your existing source code directory. This can be done using any text editor in your computer. The content of the Dockerfile needs to be the following, where should replace my_python_program.py and my_main_function with their actual names:
FROM clowder/extractors-simple-extractor:onbuild
ENV EXTRACTION_FUNC="my_main_function"
ENV EXTRACTION_MODULE="my_python_program.py"
- If there are any Python or Linux packages that are required by your code, please add them to two files named requirements.txt and packages.apt in the source code directory. Each package entry should be added to a separate line in these files.
Now, create the Docker image for your extractor using the command below. Please note that there is a dot (.) at the end of the command. You will need to open a terminal client and change to your Dockerfile directory using the cd command before running the command below (this will also install the Python packages from requirements.txt and Linux apt-get packages from packages.apt):
docker build -t my_extractor .
In the terminal, you should be able to see the logs of the services that are part of the Clowder stack.
From another terminal window, you can now run your extractor using the following command:
docker run -t -i --rm --network clowder_clowder my_extractor
You should be able to see the logs related to the starting extractor in this terminal window.
- You can always test your python code before wrapping it as an extractor. To test your built extractor, you will need to sign up and create an account in your local Clowder instance. Please follow the steps below:
- Open your web browser and go to http://<ip_address>:9000/signup, where <ip_address> needs to be replaced by your computer’s IP address. You can run ifconfig (Mac/Linux) or ipconfig (Windows) command from a terminal window to find your computer’s IP address.
- Once you are in the sign up page, please create an account using your email address as shown in figure above. Click on the "Create Account" after you enter your email address.
- Open your web browser and go to http://<ip_address>:9000/signup, where <ip_address> needs to be replaced by your computer’s IP address. You can run ifconfig (Mac/Linux) or ipconfig (Windows) command from a terminal window to find your computer’s IP address.
- :
