Integration Test Flow
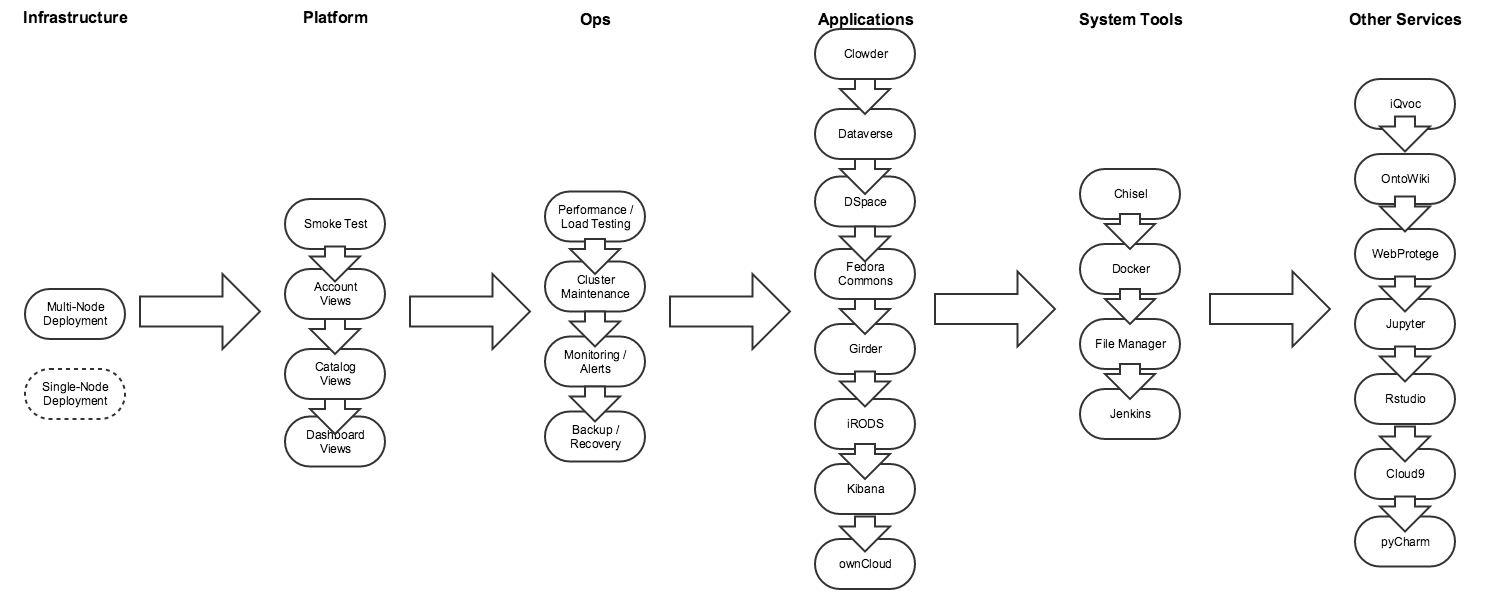
Infrastructure
Single-Node Dev Instance Deployment
Need to define, but this is a low priority.
Multi-Node Cluster Deployment
See NDS-312 - Getting issue details... STATUS
- Download openrc.sh
- Launch deploy-tools with a -v from your openrc.sh file to the /root/SAVED_AND_SENSITIVE_VOLUME directory
- Modify the inventory/minimal-for-testing file to your liking:
- logical_cluster_name
- support_email
- flavor
- ndslabs_domain
- vol_size
- Source the openrc.sh file
- Run ansible-playbook commands:
- ansible-playbook -i inventory playbooks/openstack-provision.yml
- ansible-playbook -i inventory playbooks/k8s-install.yml
- ansible-playbook -i inventory playbooks/ndslabs-k8s-install.yml
Platform
Smoke Test
- NDS-312 - Getting issue details... STATUS
- NDS-563 - Getting issue details... STATUS
- NDS-386 - Getting issue details... STATUS
- NDS-318 - Getting issue details... STATUS
Command-Line Interface
TODO: detail all possible commands, expected inputs/outputs, prerequisites, etc
Account Views
See NDS-563 - Getting issue details... STATUS
Landing Page View
Automation Status: 100%
Verify landing page content and that all links work as expected
- Learn more link
- Request access/Sign-up
- Login/Sign in
- Documentation and contact links
Register View
Automation Status: 80% (need to learn how to automate e-mail queries)
- fill out and submit request account form
- user should receive an e-mail from the server to verify your e-mail
- click the link in your e-mail
- user should receive an e-mail from the server informing you that your account is awaiting approval
- support should receive an e-mail asking them to approve or deny this account
- approve an account: “This account has been approved.”
- user should receive an e-mail from the server informing them that they can now log in
- deny an account: “This account has been denied.”
- user should receive an e-mail from the server informing them that their request has been denied, and that they should contact support with further questions
- attempt to sign up again using the same username and/or same e-mail
- API / UI server should not allow this (HTTP 409 + validation message)
- confirm terms and conditions link works
- confirm gravatar
Login View
Automation Status: 100%
- failed login
- successful login
- logout
Forgot/Reset Password View
Automation Status: 60% (need to learn how to automate e-mail queries)
- reset password with nonexistent e-mail
- reset password while logged in
- reset password while logged out
- reset password with unverified e-mail
- reset password with unapproved account
Contact Us View
Automation Status: 90% (need to learn how to verify support e-mails are being sent)
- support links
- contact us while logged out
- contact us while logged in
- verify feedback emails of each type:
- help
- bug
- wish
- comment
Spec Views
Catalog View
Automation Status: 75%
See NDS-386 - Getting issue details... STATUS
- search for apps using keywords
- search for apps using tags
- documentation link
- view json
- copy to clipboard
- clone a spec
- edit cloned spec
- delete cloned spec
- import spec
- install imported spec
- add button
- view button
- attempt to edit / delete imported spec while an instance of it exists
- Grid/list view
Add Spec View
Automation Status: 25%
- Details Tab
- Dependencies Tab
- Environment Tab
- Data Tab
- Ports Tab
- Resource Limits Tab
- Development Tab
Edit Spec View
Automation Status: 25%
- Details Tab
- Dependencies Tab
- Environment Tab
- Data Tab
- Ports Tab
- Resource Limits Tab
- Development Tab
Application Views
Dashboard View
Automation Status: 90%
See NDS-318 - Getting issue details... STATUS
- Launch file manager
- Install an application
- Add an optional service (see Add/Edit Service below)
- Start the application
- Navigate to endpoint
- Log view (see below)
- Config view (see below)
- Console view (see below)
- Stop the application
- Edit a service (see Add/Edit Service below)
- Unlock the application
- Start the application once more
- Navigate to endpoint
- Stop the application again
- Remove the application
- Enable/disable password protection
Add Optional Service View
Automation Status: 80%
- Environment Tab
- Data Tab
- Docker Tab
Edit Service View
Automation Status: 80%
- Environment Tab
- Data Tab
- Docker Tab
Log View
Automation Status: 90%
- Kubernetes Log
- Service Log
Config View
Automation Status: 90%
- Docker
- Environment
- Endpoints
Console View
Automation Status: 90%
- ls -al /home/username
- try with many services, including different base images:
- centos
- ubuntu
- alpine
- debian
- others?
NOTE: A console test could be included with service-based specs... (i.e. clowder.e2e.js to test the various plugins and verify /home/clowder contents, if we want to go that route)
Ops
Performance Testing
See NDS Labs Performance Testing
- API / UI
- LoadBalancer
- GlusterFS
Cluster Maintenance
- Restarting CoreOS (i.e. for Updates)
- Removing a Compute Node (i.e. for Maintenance)
- Adding an OpenStack Instance as a Node in your Cluster
- Adding a Compute Node
- Adding a Storage Node
Monitoring / Alerts
- TBD
Backup / Recovery
- TBD
Applications
In general:
- Install from catalog
- Add any optional plugins
- Start application
- Navigate to application's endpoint link
- Perform any necessary setup procedures
- Perform an adequate test of the system's most basic of functionality
- Uploads / Downloads
- Collection viewing
- Visualizations
- Optional plugins
- etc
Clowder + MongoDB + RabbitMQ + Elasticsearch
See NDS-320 - Getting issue details... STATUS
- Add Clowder app
- Configure Elasticsearch plugin service
- Configure Toolserver plugin service
- Configure PlantCV extractor plugin service
- RabbitMQ plugin should be added automatically
- Start Clowder app
- Navigate to its endpoint
- Create an account by verifying your e-mail address
- Login to Clowder
- Create a Dataset
- Upload PlantCV test image(s) to the Dataset
- Verify that extractors ran (logs)
- View metadata extraction results (Clowder should have attached the results in their UI)
Dataverse + PostgreSQL + Rserve + Solr + iRODS + TwoRavens
See NDS-321 - Getting issue details... STATUS
- Add and configure an iRODS iCAT application
- Add Dataverse app
- Configure TwoRavens plugin
- Configure Dataverse iCAT plugin
- Login using the default dataverseAdmin/admin username and password
- From this interface, you can create dataverses, add users, groups, permissions, etc.
- For now, we'll simply upload a file
- Select "Add Data+" > New Dataset
- Fill in required fields and select "Select files to add"
- Upload the test/test.csv file
- Select "Save dataset"
- Note that the file is converted to "Tabular" format and the "Explore" button is now enabled. Explore is the link to the TwoRavens service.
- Select "Explore", which will open the TwoRavens interface in a new tab or window
- The TwoRavens interface should display a network of variables.
DSpace + PostgreSQL
See
- Add Dspace app
- Configure Postgres plugin service
- Database Name=dspace
- Username=dspace
- Configure Dspace service
- set email address
- Set password as Postgres password
- Launch
- Login using admin email and password
- Create community > Test (select "Return" after creation)
- Select community "Test" link
- Create collection "Test" (select "Return after creation)
- Select collection 'Test" link
- Submissions > start a new submission
- Complete the submission process, including file upload
- Browse by title, confirm your submission is available and file can be downloaded
Fedora Commons
- Add Fedora Commons app
- Start Fedora Commons app
- Execute a few tests to exercise the REST API: https://wiki.duraspace.org/display/FEDORA4x/First+Steps#FirstSteps-RESTAPIExamples
Girder + MongoDB
- Add Girder app
- You should be brought to the Dashboard view, with the Girder header(s) expanded
- You should see MongoDB under the services list
- Start Girder app
- You should see the Girder application begin its startup process
- Once the endpoint comes up, click the endpoint link
- You should be brought to the Girder web interface
- At the top-right of the Girder UI, choose "Register"
- Enter some information about your desired account and click "Register"
- On the left side, choose "Admin Console", then choose "Assetstores"
- Create a new File System assetstore with the following:
- Name = "assetstore"
- Root Path = "/assetstore"
- On the left side, click "Collections" and create a new Collection
- Your new collection should contain a folder named "Private"
- Click "Private" and click the green button at the top-right
- Choose one or more files to upload items into this Collection and click "Start Upload"
- You should see you files appear in the Collection on the UI
- Click the name of your newly uploaded file
- Your browser should download the selected file
- Several interesting plugins for different use cases exist, although I did not dive into each of them:
- Jobs: long-running services
- Metadata Extraction: sounds familiar
- Several other plugins
iRODS iCAT + Cloudbrowser API + UI
- Add an iCAT stack with a zone name of "fedZone"
- Enable all optional services
- retain the iRODS password
- Start iCAT stack
- retain the internal endpoint IP of the iCAT server
- Link a Dataverse application to this iCAT server using the Dataverse iCAT service
Kibana + Elasticsearch + Logstash + LogSpout (ELK)
See NDS-318 - Getting issue details... STATUS
ownCloud
- If you're not already running your own instance of NDS Labs, check out our Setup Documentation.
- Navigate your browser to
http://YOUR_IP:30000(create a project if necessary) and log in. - You should now see "ownCloud" listed with the other services on the left side of the page.
- Click the + button beside "ownCloud" and step through the wizard to configure ownCloud:
- Choose a name your stack appropriately and click Next.
- Now, select MySQL as an optional service and click Next.
- The wizard will now prompt you to enter passwords necessary for MySQL, as specified by the "Config" in the spec above. Because we specified "isPassword" above, you can click the button on the right to generate a secure random password.
- Clicking Advanced Configuration will also allow you to set the database and username that MySQL will use, if want to change the default values.
- Choose a size to use for the volumes that will attach to these services.
- The numbers of the top-right of the colored panel will allow you to switch between the volume requirements for this stack, if more than one exist.
- You will be asked to create one volume each for ownCloud and MySQL.
- If previous volumes matching these services exist, and are not currently attached to another service, the wizard will offer to reuse them.
- Confirm that your stack looks correct and click Confirm.
- You will see your new "ownCloud" stack appear in the Stacks tab of the UI.
- Click the name of the stack to expand the accordion and show a more fine-grained status.
- You will see MySQL listed beneath the ownCloud in te Service List.
- Click the "Launch Stack" button at the bottom-right of the pane.
- Wait for the stack to start.
- NOTE: this may take several minutes the first time, as Docker will pull the image before running it.
- Once the stack has started, navigate to its endpoint by click the link to the right of the service name.
- A new tab will open, where you will be taken to the ownCloud self-installation web interface.
- Enter the username and password that you would like to use for the ownCloud administrator.
- During the setup, be sure to expand the "Storage & database".
- Choose MySQL / MariaDB to specify your MySQL instance details.
- You will be prompted to enter the database, username, and password that you specified while configuring MySQL, as well as the address of the running instance.
- Back at the NDS Labs interface, click the Config button to the right of the service name under your ownCloud stack.
- The database, username, and password are listed under "Environment".
- The address where ownCloud can reach MySQL is listed under "Endpoints" as the "Internal Address".
- NOTE: This MySQL instance is not exposed to the public internet, so there is no "External Address" listed.
- Once you have entered the details of the running MySQL instance, click Finish Setup.
- You should then be brought to your ownCloud instance's home page, where you will be able to upload new files and view existing files existing on the attached volume.
- Upload a test file somewhere into ownCloud using the + button at the top-left of the screen.
- To verify that MySQL is receiving updates from ownCloud, let's find a reference to the file you just uploaded in the MySQL database.
- Jump over to your terminal and execute
docker ps | grep mysqlto locate the running MySQL container and grab its container id. - Execute
docker exec -it <container id> mysql -u owncloud -pand enter the MySQL password for the "owncloud" user. This will drop you into the container at the mysql shell.- Click the Config button to the right of the service name under your ownCloud stack and copy / paste the MySQL password into the prompt.
- Execute the following query to verify that your new file upload was persisted to MySQL
select path from owncloud.oc_filecache order by path;. - You should see all of your files, including the newly-uploaded file, ordered by file path and listed in the output.
- Jump over to your terminal and execute
Sufia + Solr + Fedora Commons + Redis + PostgreSQL (aka "Hydra")
- View Sufia JSON, note CONFIG_REPO uses setTo solr6.CONFIG_REPO (NDS-601)
- Add service Sufia and launch it
- NDS-598: Open the solr logs and look for the section that looks like
Created core mycoreA conf/_rest_managed.jsonA conf/admin-extra.html...- This is the Sufia solr config being svn checkout'd from the ndslabs-sufia directory
- Open the Sufia endpoint
- Select "Login" > "Sign-up"
- Select "Create Collection" > "Test"
- Select "Dashboard" > My Dashboard
- Select "Create Work" > Enter required fields/upload image file > Save
System Tools
HTTP Tunnel (Chisel)
- Download the Chisel client
- Add and start RabbitMQ, note internal IP and port
- Add and start Chisel server, note endpoint URL
- Copy the command from the Chisel server logs and run your client. For example
./chisel client --auth=demo:password http://141.142.210.150:30540/ localhost:15672:10.0.0.25:156722016/08/22 12:49:48 client: Connecting to ws://141.142.210.150:30540/2016/08/22 12:49:48 client: Fingerprint 79:1b:29:80:ad:33:f7:bf:17:5a:8a:00:7e:d8:25:202016/08/22 12:49:48 client: Connected (Latency 1.930073ms) - Open your browser to localhost:15672
- Voila, you are tunneled in.
File Manager (Cloud Commander)
- Press the "Manage Files" button in the NDS Labs UI navbar
- File Manager application should be added and started automatically for you
- Once the endpoint appears, you should be automatically directed to its endpoint url
- You will be dropped at the CloudCommander UI, where you can modify the current user's Home directory
Docker
- Add Docker app
- Start Docker app
- Navigate to its endpoint
- git clone https://github.com/nds-org/developer-tutorial /test && cd /test/example-1-cowsay
- docker build -t cowsay-php .
- docker login
- docker tag cowsay-php username/cowsay-php
- docker push cowsay-php
Jenkins
- Add Jenkins app
- Start Jenkins app
- Retrieve the admin password from the logs
- Navigate to its endpoint
- Create a new job
- Set SCM type to “Git” and point at the Git repository containing the code you would like to build
- Add any build steps you want to execute – as a simple test, you can choose “Execute shell” to execute the “ls –al” command
- Click "Apply" / "Save", then build the new job – you should see your new build job appear in the queue on the left
- Click the "Build Now" to view details about it and click “Console Output” to watch the console output your build
Other Services
iQvoc
- Add iQvoc app
- Start iQvoc app
- Navigate to its endpoint
- Login admin@iqvoc / admin
- Add new collection
OntoWiki
- Login as Admin (no password)
- Select Edit >Create Knowledge Base
- TItle: Test
- "Import RDF from web"
- Select "Create Knowledge Base"
- Enter URL when prompted: https://raw.github.com/AKSW/aksw.org/master/site/data.rdf
- Confirm "Navigation" now contains classes Organization, Document, Person, Object.
WebProtege
- Add WebProtege app
- Start WebProtege app
- the service can take a long time to become ready
- Navigate to its endpoint
- the JavaScript can take a long time to load
- Sign up, then sign-in
- Create project "test"
- Select "test" project link
- Select Classes > Create > "test"
IDEs
Cloud9
- Add Cloud9 app
- Start Cloud9
- Import code snippet
- Run code snippet
- Place a breakpoint
- Enable debugger
- Debug code snippet
Jupyter
- Add Jupyter app
- Start Jupyter
- Retrieve password from logs
- Navigate to its endpoint
- Import script into notebook
- Evaluate the cell containing you script
pyCharm
- Add pyCharm stack
- Start pyCharm
- Navigate to its endpoint
- On first open, you will be prompted to import and accept a license.
- Once opened, create a new project
- Create a new file "Hello.py"
class Hello:def f(self):print("NDS-342") - Right click and run and debug the application.
- In the bottom left corner, select the grey box and open a terminal
- Close the browser window and reopen the endpoint link – you should be just where you started
- Select File > Exit – you will be shown an Xpra Conncet page (I need to do something with this if we're satisfied with the PyCharm/Xpra container). Close it.
- Reopen the endpoint link, you should be taken to the opened IDE
Rstudio
- Add Rstudio app
- Start Rstudio and navigate to its endpoint
- At the top-left, choose "New > Text File", and enter the following data, and save this file as "data.txt"
Notice the blank line at the end of the file - this is required
data.txt1 2 3 4 5
Again at the top-left, choose "New > R Script", enter the following script, and save the file as "read.r"
read.rd <- read.table("data.txt"); summary(d); print('Done!');- In Rstudio's Console (bottom-left pane), run *source('~/read.r')* to execute your new r script
- You should see your script variable values populate in the upper-right pane
- Your script should output the following: [1] "Done!"
Low-level Services
In general:
- Install application
- Ingress should link to endpoint
- Endpoint should link to a service
- Start application
- API server should spawn a replication controller
- Replication controller should spawn a pod
- Service should round-robin requests to pods whose labels match and are "Ready"
- Install and start HTTP Tunnel app
- Download the HTTP Tunnel (Chisel) client
- Open a Chisel tunnel to your newly started application's internal endpoint
- The port is dependent which service you are trying to access
Elasticsearch
- Install Elasticsearch 2.0
- Start Elasticsearch 2.0
- Open chisel tunnel to port 9200
- curl localhost:9200
RabbitMQ
- Install RabbitMQ
- Start RabbitMQ
- Open chisel tunnel to port 5672
- curl localhost:5672
Databases
- Same as above, but maybe insert some data?
MongoDB
- Install MongoDB
- Start Mongo
- Open chisel tunnel to port 27017
- curl localhost:27017
MySQL
- Install MySQL
- Start MySQL
- Open chisel tunnel to port 3306
- curl localhost:3306
PostgreSQL
- Install PostgreSQL
- Start PostgreSQL
- Open chisel tunnel to port 5432
- curl localhost:5432